welcome

welcome to my destiny :)
I'm just a guy who is smile a lot
and the god give me a power
-------------------------------------------

You say anything Just tell me all your sweet lies

-------------------------------------------------

Time may change my life
But my heart remains the same to you
Time may change your heart
My love for you never changes

Showing posts with label ipod. Show all posts

Thursday, March 15, 2012

How To: Install SARA Cydia Tweak (Siri Clone) To iPhone, iPod Touch Or iPad

How To: Install SARA Cydia Tweak (Siri Clone) To iPhone, iPod Touch Or iPad


When Siri was first released for the iPhone 4S it left many people wondering if Apple would release Siri for older generation iOS devices. Now, a few months later it has become obvious that Apple will not be releasing Siri for older generation iOS devices and thus it is up to the Jailbreaking community to develop a suitable alternative.
Earlier today we told you about a Siri clone dubbed SARA that has been claimed to be one of the best and most innovative Siri clones to date. It is not only an accurate, but extends Siri’s default functionality dramatically. If you are interested in getting Siri on your:
  • iPhone 4, iPhone 3GS, iPhone 3G, iPhone 2G
  • iPod Touch 4G, iPod Touch 3G, iPod Touch 2G
  • iPad 2G, iPad 1G
Then you will be glad to know that in this how to guide from iJailbreak.com you will learn how to install the SARA tweak through Cydia and even install the SARA Cydia tweak manually in case you have troubles downloading the tweak (due to server restraints).
Note: The SARA Cydia tweak does not natively integrate with your iOS device at this time (it is an application that must be launched from your SpringBoard). Additionally, for all of you wondering, the SARA Cydia tweak is based on Spire and uses a 3rd party server for most requests. This means that there is a possibility your personal information sent through Siri could be being logged (even though the author notes no information will ever be logged). Use SARA at your own risk.

How To Install SARA Through Cydia

Step 1) – The first thing you will need to do is Jailbreak your iPhone, iPod Touch or iPad running the iOS 5.0 or iOS 5.0.1 firmware. For more information on how to Jailbreak your iOS device please go to iJailbreak’s How To Jailbreak Section.
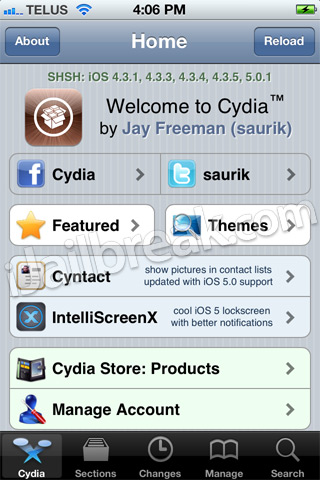
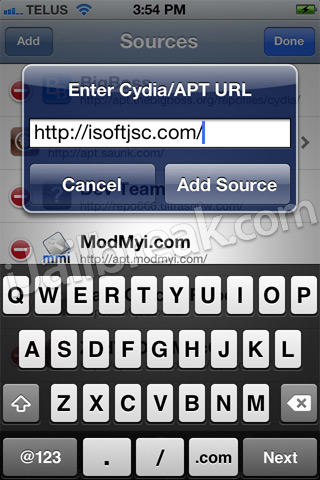
Step 2) - Next you will launch Cydia, go into the Manage Tab, then the Sources Section, click the Edit button and then the Add button. From here you will need to add the following source:
http://isoftjsc.com
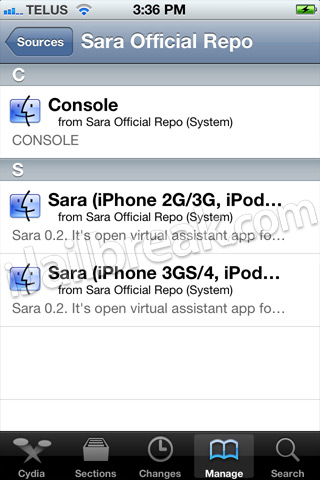
Step 3) – When the source has been added into your repository list, click on it and you will see three packages. Please install the package that corresponds to the iOS device you are trying to install SARA to.
Note: The Console package is only for submitting error reports to the developer of SARA.
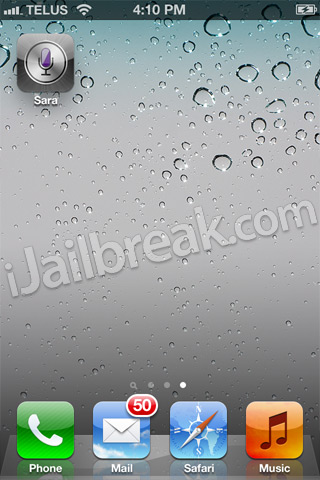
Step 4) – Once you have installed SARA to your iPhone, iPod Touch or iPad you will notice a SARA icon on your SpringBoard (homescreen).
Manually Install SARA Siri Clone

Prerequisite: You must have the afc2add Cydia package installed on your iPhone, iPod Touch or iPad before continuing the steps to manually install the SARA Cydia tweak.
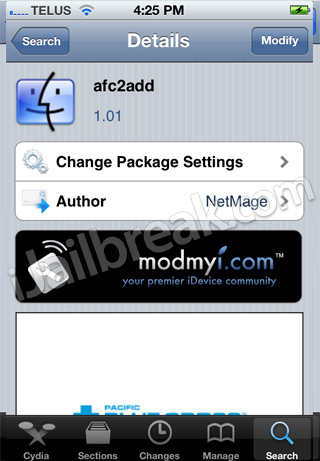
Step 1) – Like always for installing any sort of 3rd party software the first thing you will need to do is Jailbreak your iPhone, iPod Touch or iPad running the iOS 5.0 or iOS 5.0.1 firmware. For more information on how to Jailbreak your iOS Device please go to iJailbreak’s How To Jailbreak Section.
Step 2) - Next you will need to download a file-system editor program for your Windows or Mac OS X computer. We recommend a program called iExplorer, which can be downloaded by clicking here. The last file you will need to download is the SARA.deb 0.3 file. This can be downloaded by clicking here.
Step 3) – With the required files downloaded you will need to launch your file-system editor program and go to the following directory:
private\var\root\Media\Cydia\AutoInstall
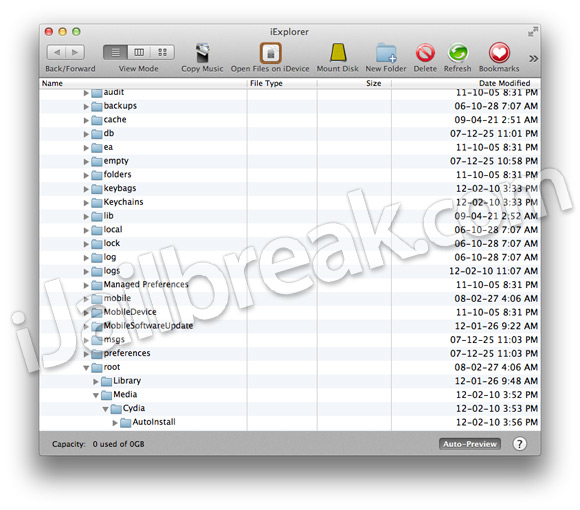
Note: When you get to the Media folder you may not see a Cydia folder. If this is the case for you then you will need to create a folder dubbed Cydia and then another folder inside the Cydia folder dubbed AutoInstall.
Step 4) – When you are in the directory shown above you will need to drop the SARA.deb file you downloaded earlier into the AutoInstall folder.
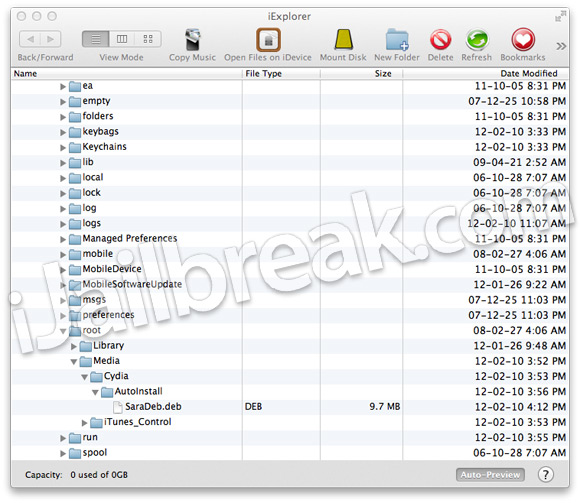
Step 5) – When the file has finished transferring you will simply need to reboot your iOS device twice and then you should notice a SARA icon on your SpringBoard (homescreen).
Congratulations you have just gotten Siri on your iPhone, iPod Touch or iPad! For more how to guides like the one you just followed please visit iJailbreak’s How To Section. Additionally, please leave any further questions or thoughts in the comments section below…


Monday, March 1, 2010

How to Register an iTunes App Store Account without Credit Card

http://www.simonblog.com/2009/04/14/how-to-register-an-itunes-app-store-account-without-credit-card/

1.go to istore
2 free game
3 create new account
4 fill form

register iphone detail here

USA
ZIP code: 15419
State: Pennsylvania
County : PA Pennsylvania
CITY: California

phone number (800) 456-6622

Sunday, November 22, 2009

Jailbreak iPhone 3.1.2 Firmware with blackra1n

Jailbreak iPhone 3.1.2 Firmware with blackra1n

George Hotz (aka geohot), the kid who was the first to unlock the original iPhone back in 2007 and then iPhone 3GS in July of this year is back! This time he is the first one to release jailbreaking solution for the new iPhone 3.1.2 Firmware for all devices through his new tool called blackra1n. blackra1n is a software tool which can jailbreak (not unlock) all iPhone’s (iPhone (Edge), iPhone 3G and iPhone 3GS) and iPod touch’s (iPod touch 2G and 3G) running on firmware version 3.1.2. blackra1n is currently for Windows only, a Mac version of this app can be expected soon.

UPDATE: An updated version of this guide for blackra1n RC3 with blacksn0w can be found here.

So, what is blackra1n? blackra1n is a 30 second ALL device 3.1.2 jailbreak. Even the ipt3, but the ipt3 is tethered. In order to boot it, just rerun blackra1n.

blackra1n - Jailbreak for iPhone 3.1.2 FirmwareImage via ModMyi

Follow the steps below to jailbreak all iPhone’s and iPod touches on OS 3.1.2:

Note for iPhone 3G and 3GS: Do NOT upgrade to iPhone 3.1.2 with blackra1n if you want to keep your unlock as doing so will result in upgrade of your baseband which will make it almost impossible for you to unlock.

Step 1: Download and install the latest version of iTunes (download link given below).

Step 2: You will now need to first update/restore to the original iPhone OS firmware 3.1.2 on your iPhone by using the latest version of iTunes. Download link for iPhone Firmware 3.1.2 is given at the end of the post.

iPhone OS Firmware 3.1.2

Step 3: Download blackra1n for Windows (download link at the end of the post).

Step 4: Start blackra1n app. If you are on Windows 7 or Vista, run the app with “Windows XP Compatibility” mode by enabling it from the “Properties” tab to avoid any errors during the jailbreak process.

Step 5: Click on “make it ra1n”:

blackra1n

Step 6: Let the app do its thing and wait for the phone to automatically reboot.

Step 7: You should now have “blackra1n” in the list of applications on your iPhone. Run “blackra1n”, download Cydia and let it install it.

blackra1n

blackra1nImage Credit: elmarseillais

Step 8: Finally reboot your iPhone. Voila! You should now have fully jailbroken iPhone or iPod touch running on firmware 3.1.2.

UPDATE 1: PwnageTool 3.1.4 has been released which can Jailbreak iPhone on 3.1.2 while keeping its baseband intact to 04.26.08. Complete step-by-step jailbreaking guide for Mac OS X can be found here and for Windows here. Unlocking guide for iPhone 3G and 3GS on 3.1.2 firmware can be found here.

UPDATE 2: blackra1n is now available for Mac OS X as well. Download link plus complete step-by-step instructions guide on how to jailbreak iPhone/iPod touch using blackra1n on Mac OS X can be found here.

UPDATE 3: Follow the step-by-step guide posted here to fix missing carrier name or logo on your unlocked and jailbroken iPhone 3G/3GS running firmware 3.1.2.

UPDATE 4: Follow the step-by-step guide posted here to Enable Tethering on iPhone 3.1.2 Firmware.

UPDATE 5: You may also like to check out How to: Patch MobileInstallation File on iPhone 3.1.2 Firmware.

UPDATE 6: Native MMS functionality in Messages app on iPhone 2G can now be enabled using the step by step guide posted here.

UPDATE 7: Fix Push Notifications on Hacktivated iPhone 2G/3G/3GS running iPhone firmware 3.1.2 can be found here.

UPDATE 8: blackra1n RC2 is Live. Click here for more details.

UPDATE 9: blackra1n RC3 with blacksn0w is now available. Follow the complete step-by-step guide here to jailbreak, and here to unlock iPhone 3.1.2 firmware with 05.11.07 baseband.

You can follow me on twitter or join our facebook fanpage to keep yourself updated on all the latest iPhone jailbreaking and unlocking releases.

Download iTunes
Download iPhone 3.1.2 Firmware
Download blackra1n for Windows (UPDATE: blackra1n RC3 Now Available)


Video results for how to jailbreak iphone 3.1.2 youtube

Jailbreak 3.1.2 iPhone iPod Touch with ...
4 ນາທີ 47 ວິນາທີ - 14 ຕລ 2009
www.youtube.com
Jailbreak 3.1.2 iPhone & iPod Touch w ...
9 ນາທີ - 11 ຕລ 2009
www.youtube.com

Thursday, January 1, 2009

The required disk cannot be found - I can't sync my iPod

Follow these steps exactly and you should have an iPod free from the dreaded "Disk not available" error! Please note that I've only encountered this problem on my iPod Shuffle (2nd Gen), so have only been able to confirm this working on that, YMMV.

To begin with, ensure iTunes is not running, and your iPod is not connected. Make sure you read through the following steps before your begin.

1. Run "c:\WINDOWS\system32\devmgmt.msc" (this is the Device Manager), this will need to be used later, but you'll need it quickly when you do.
2. Start iTunes
3. Connect iPod
4. Go to your iPod Settings and select "Enable disk use"
5. A dialog box will pop up reminding you that you'll need to manually eject. Hit OK
6. Hit Apply to save changes to the iPod
7. Quickly switch to Device Manager window and right-click on any item there and select "Scan for hardware changes"
8. Switch back to iTunes, where you should have a nice, working iPod!

Hope this helps everyone, please post you results

Sources: http://discussions.apple.com/thread.jspa?messageID=6381890

LinkWithin

Related Posts Plugin for WordPress, Blogger...

Fm-radio-on-my-site

for you forever

Birthday - 13/12/1964 Death - 02/05/1997 bye bye hide

google analysis

ຊີວິດກໍ່ເໝືອນລະຄອນຕ່າງທີ່ບໍ່ສາດມາດຫຼິ້ນຄືນໃໝ່ໄດ້
ຊີວິດແມ່ນການສະແດງ ທີ່ບໍ່ມີຜູ້ກຳກັບ

online
Online Casino


website counter