welcome

welcome to my destiny :)
I'm just a guy who is smile a lot
and the god give me a power
-------------------------------------------

You say anything Just tell me all your sweet lies

-------------------------------------------------

Time may change my life
But my heart remains the same to you
Time may change your heart
My love for you never changes

Showing posts with label cydia. Show all posts

Thursday, March 15, 2012

How To: Install SARA Cydia Tweak (Siri Clone) To iPhone, iPod Touch Or iPad

How To: Install SARA Cydia Tweak (Siri Clone) To iPhone, iPod Touch Or iPad


When Siri was first released for the iPhone 4S it left many people wondering if Apple would release Siri for older generation iOS devices. Now, a few months later it has become obvious that Apple will not be releasing Siri for older generation iOS devices and thus it is up to the Jailbreaking community to develop a suitable alternative.
Earlier today we told you about a Siri clone dubbed SARA that has been claimed to be one of the best and most innovative Siri clones to date. It is not only an accurate, but extends Siri’s default functionality dramatically. If you are interested in getting Siri on your:
  • iPhone 4, iPhone 3GS, iPhone 3G, iPhone 2G
  • iPod Touch 4G, iPod Touch 3G, iPod Touch 2G
  • iPad 2G, iPad 1G
Then you will be glad to know that in this how to guide from iJailbreak.com you will learn how to install the SARA tweak through Cydia and even install the SARA Cydia tweak manually in case you have troubles downloading the tweak (due to server restraints).
Note: The SARA Cydia tweak does not natively integrate with your iOS device at this time (it is an application that must be launched from your SpringBoard). Additionally, for all of you wondering, the SARA Cydia tweak is based on Spire and uses a 3rd party server for most requests. This means that there is a possibility your personal information sent through Siri could be being logged (even though the author notes no information will ever be logged). Use SARA at your own risk.

How To Install SARA Through Cydia

Step 1) – The first thing you will need to do is Jailbreak your iPhone, iPod Touch or iPad running the iOS 5.0 or iOS 5.0.1 firmware. For more information on how to Jailbreak your iOS device please go to iJailbreak’s How To Jailbreak Section.
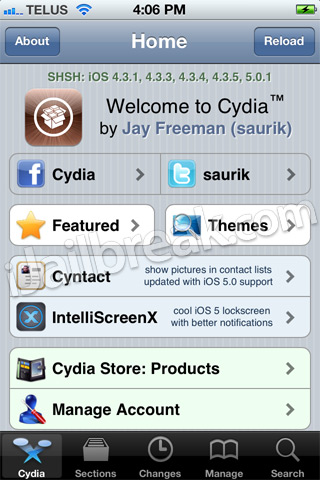
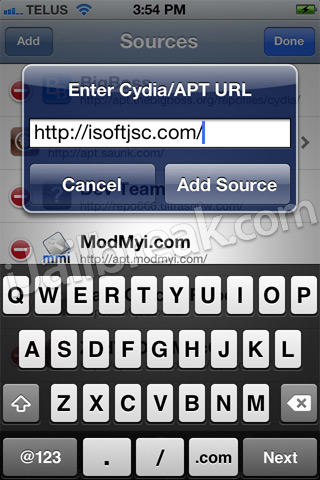
Step 2) - Next you will launch Cydia, go into the Manage Tab, then the Sources Section, click the Edit button and then the Add button. From here you will need to add the following source:
http://isoftjsc.com
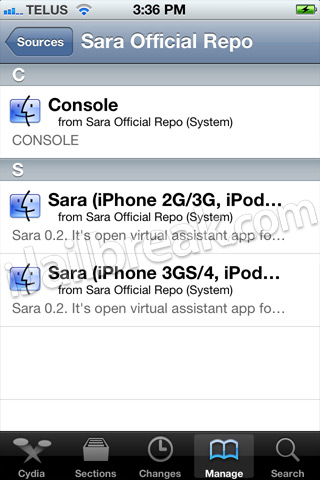
Step 3) – When the source has been added into your repository list, click on it and you will see three packages. Please install the package that corresponds to the iOS device you are trying to install SARA to.
Note: The Console package is only for submitting error reports to the developer of SARA.
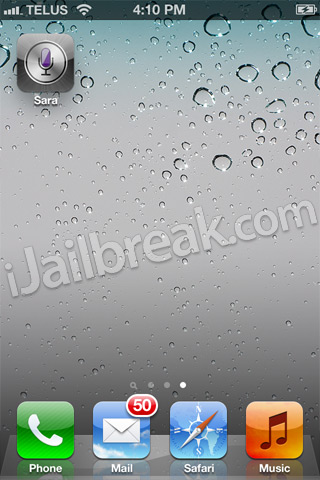
Step 4) – Once you have installed SARA to your iPhone, iPod Touch or iPad you will notice a SARA icon on your SpringBoard (homescreen).
Manually Install SARA Siri Clone

Prerequisite: You must have the afc2add Cydia package installed on your iPhone, iPod Touch or iPad before continuing the steps to manually install the SARA Cydia tweak.
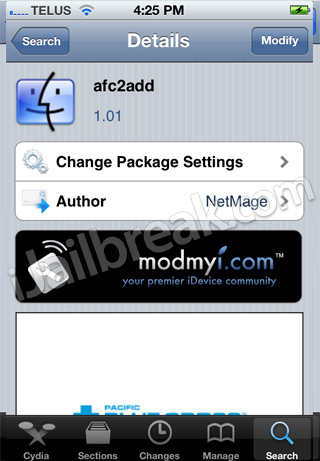
Step 1) – Like always for installing any sort of 3rd party software the first thing you will need to do is Jailbreak your iPhone, iPod Touch or iPad running the iOS 5.0 or iOS 5.0.1 firmware. For more information on how to Jailbreak your iOS Device please go to iJailbreak’s How To Jailbreak Section.
Step 2) - Next you will need to download a file-system editor program for your Windows or Mac OS X computer. We recommend a program called iExplorer, which can be downloaded by clicking here. The last file you will need to download is the SARA.deb 0.3 file. This can be downloaded by clicking here.
Step 3) – With the required files downloaded you will need to launch your file-system editor program and go to the following directory:
private\var\root\Media\Cydia\AutoInstall
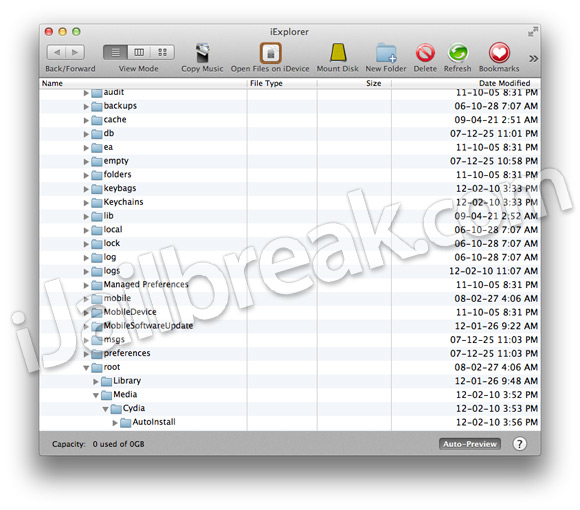
Note: When you get to the Media folder you may not see a Cydia folder. If this is the case for you then you will need to create a folder dubbed Cydia and then another folder inside the Cydia folder dubbed AutoInstall.
Step 4) – When you are in the directory shown above you will need to drop the SARA.deb file you downloaded earlier into the AutoInstall folder.
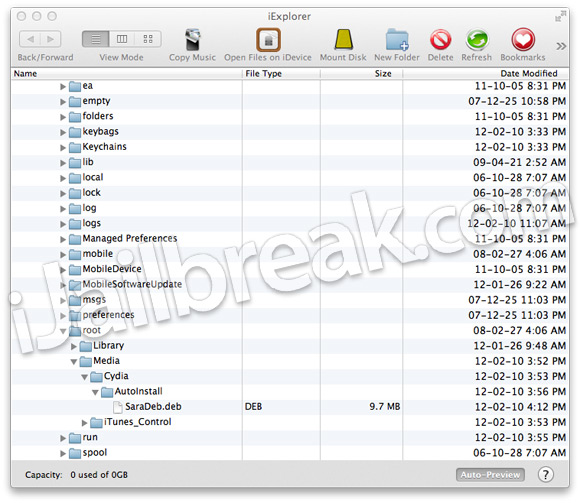
Step 5) – When the file has finished transferring you will simply need to reboot your iOS device twice and then you should notice a SARA icon on your SpringBoard (homescreen).
Congratulations you have just gotten Siri on your iPhone, iPod Touch or iPad! For more how to guides like the one you just followed please visit iJailbreak’s How To Section. Additionally, please leave any further questions or thoughts in the comments section below…


Saturday, February 18, 2012

Fix iMessage/FaceTime & Push Notifications On Hacktivated iPhone 4/3GS

Fix iMessage/FaceTime & Push Notifications On Hacktivated iPhone 4/3GS


Fix iMessage/FaceTime & Push Notifications On Hacktivated iPhone 4/3GS

iOS 5 brought with it a plethora of new features, including the infamous iMessage that allowed users to communicate with any other iOS 5 device over a WiFi/mobile data connection, effectively eliminating the cost of carrier SMS plans. While highly appreciated and useful, iMessage was something jailbroken users remained envious of, particularly those on unofficial carriers, since iMessage requires activation with iTunes before it can be used. Hacktivating your iOS 5 device bypasses that, and while you can use your iPhone 4 or 3GS, features like iMessage, FaceTime and push notifications remain unavailable unless you’re willing to pay for solutions like PushFix and MiTime.
This all changed with SAM (Subscriber Artificial Module), which allows you to activate your iPhone using legitimate certificates generated through iTunes. Advantage? You get fully working push notifications, FaceTime and iMessage (iOS 5 only) without needing to spend a single buck. Read on after the jump to find out how.

Before we begin, allow me to explain a little how this works. iTunes activates your new iPhone using your official (supported) carrier’s IMSI, taken from the SIM card. When you hacktivate the device for use with unofficial carrier, this process is bypassed by running a daemon constantly in the background, fooling iTunes into believing that the device is already activated. While there are numerous methods and tools available for hacktivation, SAM, a free package on Cydia, spoofs a fake IMSI, making iTunes believe that the device is running on an official carrier’s SIM, thus making the program generate legitimate activation certificates. While this fixes the ‘push notifications not working’ issue, on iOS 5, it also fixes FaceTime and iMessage. You also get considerably better battery life, thanks to skipping the activation daemon constantly running in background (even better for ultrasn0w unlockers).
The process described here was tested on iPhone 4 (GSM version) jailbroken using sn0wbreeze 2.8b8, running iOS 5.0. The usual warning applies; while fully tested, proceed with this method at your own risk. AddictiveTips cannot be held liable for any damage whatsoever.
You will need a jailbroken, already-hacktivated iPhone 4/iPhone 3GS, with Cydia up and running.
First, launch Cydia, head on to the Manage tab and add the following source.


http://repo.bingner.com
Once your new repository is added, search for SAM, or find the package in the repository manually, and install it.
SAM Cydia Package
With SAM installed, you’ll find a SAMPrefs icon on your iPhone’s Springboard. Launch SAMPrefs and navigate to Utilities menu.
SAMPrefs
Under Utilities, tap the option that says “Revert Lockdown to Stock”. This will deactivate your hacktivation, but don’t worry about it; your iPhone will remain functional.
Revert Lockdown
A message will pop up claiming that Stockification was a success. Hit OK to dismiss.
Stockification Success
Next, on the same screen, hit the De-Activate iPhone (clear push) button. Another message will pop up, confirming that the phone has been deactivated.
Deactivated
Now, if you had your iPhone already connected to your PC, remove the USB cable and reconnect. Otherwise, just connect it with iTunes and let it activate (one sync is all it takes with SAM package installed). Also, at this point, if iPusher app was already installed on your iPhone, remove it.
At this point, the activation is basically complete and you can verify that by navigating to Settings > SAM > More Information. If it says Wildcard Activated, you’re good to go.
Wildcard Activated
Once your iPhone is activated, launch SAMPrefs again, tap Utilities and you’ll notice that the menu displayed is different from the last time around. Hit Backup Activation, followed by Restore Activation. A success popup should follow.
Backup Activation
From here on begins the part that requires patience (bothered me, at least). Reboot your iPhone and then let it sync with iTunes. Once that is done, install the free iPusher app from App Store [iTunes link].
iPusher
Reboot your iPhone again (yeah, that’s two reboots before you can actually use it – I didn’t like that, either) and sync once more with iTunes. Also, ensure that you have a working WiFi connection with active internet access. Then, launch iPusher, allow it to send you push notifications, and tap the Test Push Notifications button. Should you see the below screen, breathe a sigh of relief, for everything works!
iPusher_Success
This should basically fix everything, but to be sure, it’s better that you turn off both iMessage and FaceTime, and reactivate them. To do that, go to Settings > Phone and turn off FaceTime. For iMessage, follow Settings > Messages and turn off iMessage. Now, reboot your iPhone again, turn both these features back on and they should be good to go.
IMG_0017
It’s worth mentioning that in Settings, both iMessage and FaceTime still show ‘activation unsuccessful’. They do work, nevertheless.
IMG_0018
Now that you can use your otherwise-hacktivated iPhone 4/iPhone 3GS back to their full potential, do share the goodness with your friends and loved ones. Please note that this method works for iPhone 4 and iPhone 3GS only, running iOS 5 on an unofficial carrier. Also, you won’t need these settings if you’re using a factory-unlocked phone, since they don’t need to be hacktivated at all anyway.

http://www.addictivetips.com/mobile/fix-imessage-facetime-push-notifications-on-hacktivated-iphone-4-3gs/

LinkWithin

Related Posts Plugin for WordPress, Blogger...

Fm-radio-on-my-site

for you forever

Birthday - 13/12/1964 Death - 02/05/1997 bye bye hide

google analysis

ຊີວິດກໍ່ເໝືອນລະຄອນຕ່າງທີ່ບໍ່ສາດມາດຫຼິ້ນຄືນໃໝ່ໄດ້
ຊີວິດແມ່ນການສະແດງ ທີ່ບໍ່ມີຜູ້ກຳກັບ

online
Online Casino


website counter