welcome

welcome to my destiny :)
I'm just a guy who is smile a lot
and the god give me a power
-------------------------------------------

You say anything Just tell me all your sweet lies

-------------------------------------------------

Time may change my life
But my heart remains the same to you
Time may change your heart
My love for you never changes

Showing posts with label hack. Show all posts

Thursday, March 15, 2012

How To: Install SARA Cydia Tweak (Siri Clone) To iPhone, iPod Touch Or iPad

How To: Install SARA Cydia Tweak (Siri Clone) To iPhone, iPod Touch Or iPad


When Siri was first released for the iPhone 4S it left many people wondering if Apple would release Siri for older generation iOS devices. Now, a few months later it has become obvious that Apple will not be releasing Siri for older generation iOS devices and thus it is up to the Jailbreaking community to develop a suitable alternative.
Earlier today we told you about a Siri clone dubbed SARA that has been claimed to be one of the best and most innovative Siri clones to date. It is not only an accurate, but extends Siri’s default functionality dramatically. If you are interested in getting Siri on your:
  • iPhone 4, iPhone 3GS, iPhone 3G, iPhone 2G
  • iPod Touch 4G, iPod Touch 3G, iPod Touch 2G
  • iPad 2G, iPad 1G
Then you will be glad to know that in this how to guide from iJailbreak.com you will learn how to install the SARA tweak through Cydia and even install the SARA Cydia tweak manually in case you have troubles downloading the tweak (due to server restraints).
Note: The SARA Cydia tweak does not natively integrate with your iOS device at this time (it is an application that must be launched from your SpringBoard). Additionally, for all of you wondering, the SARA Cydia tweak is based on Spire and uses a 3rd party server for most requests. This means that there is a possibility your personal information sent through Siri could be being logged (even though the author notes no information will ever be logged). Use SARA at your own risk.

How To Install SARA Through Cydia

Step 1) – The first thing you will need to do is Jailbreak your iPhone, iPod Touch or iPad running the iOS 5.0 or iOS 5.0.1 firmware. For more information on how to Jailbreak your iOS device please go to iJailbreak’s How To Jailbreak Section.
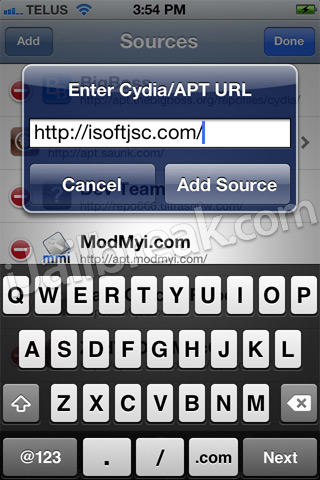
Step 2) - Next you will launch Cydia, go into the Manage Tab, then the Sources Section, click the Edit button and then the Add button. From here you will need to add the following source:
http://isoftjsc.com
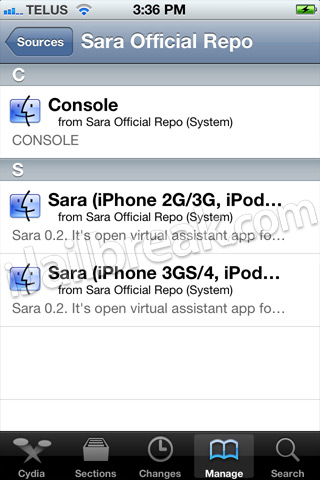
Step 3) – When the source has been added into your repository list, click on it and you will see three packages. Please install the package that corresponds to the iOS device you are trying to install SARA to.
Note: The Console package is only for submitting error reports to the developer of SARA.
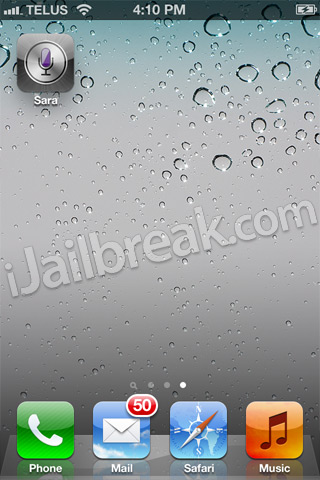
Step 4) – Once you have installed SARA to your iPhone, iPod Touch or iPad you will notice a SARA icon on your SpringBoard (homescreen).
Manually Install SARA Siri Clone

Prerequisite: You must have the afc2add Cydia package installed on your iPhone, iPod Touch or iPad before continuing the steps to manually install the SARA Cydia tweak.
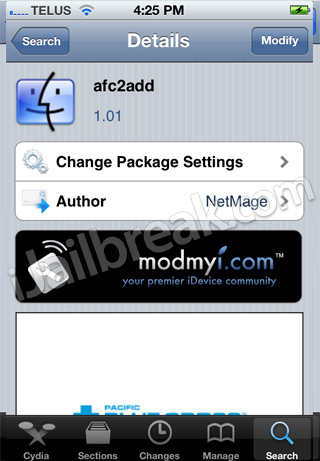
Step 1) – Like always for installing any sort of 3rd party software the first thing you will need to do is Jailbreak your iPhone, iPod Touch or iPad running the iOS 5.0 or iOS 5.0.1 firmware. For more information on how to Jailbreak your iOS Device please go to iJailbreak’s How To Jailbreak Section.
Step 2) - Next you will need to download a file-system editor program for your Windows or Mac OS X computer. We recommend a program called iExplorer, which can be downloaded by clicking here. The last file you will need to download is the SARA.deb 0.3 file. This can be downloaded by clicking here.
Step 3) – With the required files downloaded you will need to launch your file-system editor program and go to the following directory:
private\var\root\Media\Cydia\AutoInstall
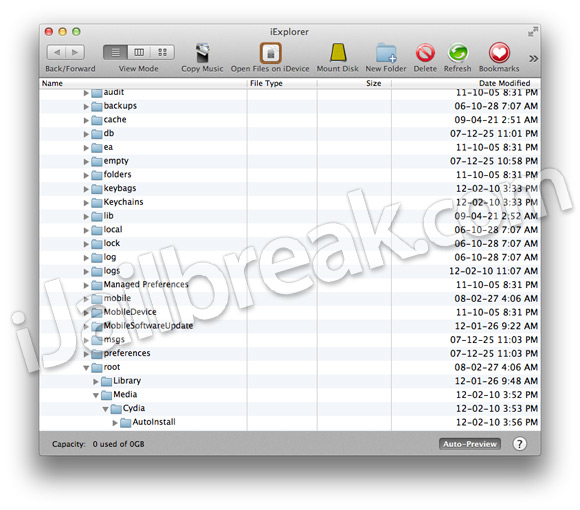
Note: When you get to the Media folder you may not see a Cydia folder. If this is the case for you then you will need to create a folder dubbed Cydia and then another folder inside the Cydia folder dubbed AutoInstall.
Step 4) – When you are in the directory shown above you will need to drop the SARA.deb file you downloaded earlier into the AutoInstall folder.
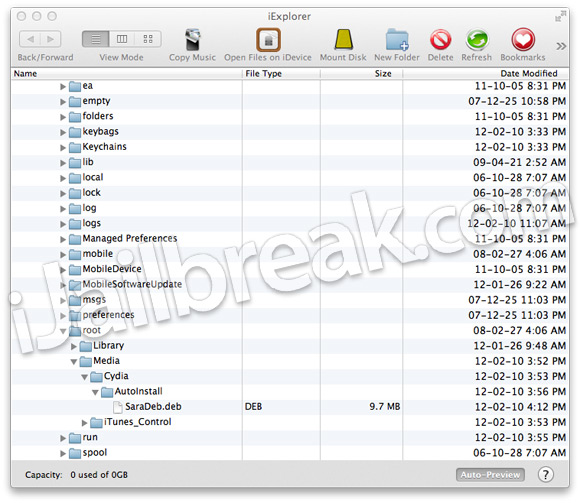
Step 5) – When the file has finished transferring you will simply need to reboot your iOS device twice and then you should notice a SARA icon on your SpringBoard (homescreen).
Congratulations you have just gotten Siri on your iPhone, iPod Touch or iPad! For more how to guides like the one you just followed please visit iJailbreak’s How To Section. Additionally, please leave any further questions or thoughts in the comments section below…


Friday, September 16, 2011

lao keyboard for nokia 5800

screen short
ຄີບອດພາສາລາວ ສຳລັບມືຖື Nokia


Thursday, September 1, 2011

z4root Root Any Android Devices

z4root Root Any Android Devices

how to root Android System

Froyo is a bit of a pain to root! Well, this fixes that.

Credits

z4ziggy
Sebastian Krahmer's rageagainstthecage

What this does

It is an app you install from the market or by side loading, that has a single button that will root your device.

How safe is this?

Should be 100% safe - nothing on disk is changed besides the root binaries, so if something goes wrong, simply rebooting the device should fix up any and all issues. Let me know if you find any bugs!

The new temporary root option works on 99% of available Android devices - no list yet of which specific devices are incompatible with the temporary root option - I am still trying to find out.

Here is the list so far of known compatible and incompatible devices for the permanent root option. I haven't actually tested these myself - I only have a Galaxy S device - but this list has been created by reports from users.

Compatible with PERMANENT root option

Samsung Galaxy S (All variants)
Backflip
Sony X10
Xperia Mini
Droid 2
Galaxy Tab
Galaxy I5700
Galaxy 3 I5800
Droid X
Samsung Acclaim
Cricket Huawei Ascend
Motorola Cliq
Huawei 8120
Hero
G1
Optimus T
Droid 1
Garmin Asus A50
Motorola Defy
LG Ally
Motorola Flipside
Motorola Milestone 2
Dell streak
X10 Mini Pro
Smartq v7 android 2.1

Incompatible with PERMANENT root option

Desire (requires nand unlock)
Desire HD (requires nand unlock)
Magic (unknown)
Evo (requires nand unlock)
G2 (requires nand unlock)
Archos 70 (unknown)
myTouch 3G (unknown)
Wildfire
Droid Incredible


Changelog

V1.0.0 : Initial Release
V1.1.0 : Will now open the application settings page if USB debugging is not enabled.
V1.2.0 : Unroot support, fix for devices with small max file size such as I5700, binaries in xbin rather than bin
V1.2.1 : Back to /system/bin for support for some devices. Fix for QVGA devices.
V1.2.2 : Adverts added (can be permanently disabled with menu option). Hopeful fix for devices such as Moment (Did not work).
V1.3.0 : Force unroot option, temporary root option.

Market

This application is available directly from the market. Search for 'z4root'

Donations

If this app helps you out, you can donate here:
https://www.paypal.com/cgi-bin/websc...if%3aNonHosted

download

http://www.mediafire.com/?n46io98h1oqkzao

thanks

http://forum.xda-developers.com/showthread.php?t=833953

Sunday, November 22, 2009

Jailbreak iPhone 3.1.2 Firmware with blackra1n

Jailbreak iPhone 3.1.2 Firmware with blackra1n

George Hotz (aka geohot), the kid who was the first to unlock the original iPhone back in 2007 and then iPhone 3GS in July of this year is back! This time he is the first one to release jailbreaking solution for the new iPhone 3.1.2 Firmware for all devices through his new tool called blackra1n. blackra1n is a software tool which can jailbreak (not unlock) all iPhone’s (iPhone (Edge), iPhone 3G and iPhone 3GS) and iPod touch’s (iPod touch 2G and 3G) running on firmware version 3.1.2. blackra1n is currently for Windows only, a Mac version of this app can be expected soon.

UPDATE: An updated version of this guide for blackra1n RC3 with blacksn0w can be found here.

So, what is blackra1n? blackra1n is a 30 second ALL device 3.1.2 jailbreak. Even the ipt3, but the ipt3 is tethered. In order to boot it, just rerun blackra1n.

blackra1n - Jailbreak for iPhone 3.1.2 FirmwareImage via ModMyi

Follow the steps below to jailbreak all iPhone’s and iPod touches on OS 3.1.2:

Note for iPhone 3G and 3GS: Do NOT upgrade to iPhone 3.1.2 with blackra1n if you want to keep your unlock as doing so will result in upgrade of your baseband which will make it almost impossible for you to unlock.

Step 1: Download and install the latest version of iTunes (download link given below).

Step 2: You will now need to first update/restore to the original iPhone OS firmware 3.1.2 on your iPhone by using the latest version of iTunes. Download link for iPhone Firmware 3.1.2 is given at the end of the post.

iPhone OS Firmware 3.1.2

Step 3: Download blackra1n for Windows (download link at the end of the post).

Step 4: Start blackra1n app. If you are on Windows 7 or Vista, run the app with “Windows XP Compatibility” mode by enabling it from the “Properties” tab to avoid any errors during the jailbreak process.

Step 5: Click on “make it ra1n”:

blackra1n

Step 6: Let the app do its thing and wait for the phone to automatically reboot.

Step 7: You should now have “blackra1n” in the list of applications on your iPhone. Run “blackra1n”, download Cydia and let it install it.

blackra1n

blackra1nImage Credit: elmarseillais

Step 8: Finally reboot your iPhone. Voila! You should now have fully jailbroken iPhone or iPod touch running on firmware 3.1.2.

UPDATE 1: PwnageTool 3.1.4 has been released which can Jailbreak iPhone on 3.1.2 while keeping its baseband intact to 04.26.08. Complete step-by-step jailbreaking guide for Mac OS X can be found here and for Windows here. Unlocking guide for iPhone 3G and 3GS on 3.1.2 firmware can be found here.

UPDATE 2: blackra1n is now available for Mac OS X as well. Download link plus complete step-by-step instructions guide on how to jailbreak iPhone/iPod touch using blackra1n on Mac OS X can be found here.

UPDATE 3: Follow the step-by-step guide posted here to fix missing carrier name or logo on your unlocked and jailbroken iPhone 3G/3GS running firmware 3.1.2.

UPDATE 4: Follow the step-by-step guide posted here to Enable Tethering on iPhone 3.1.2 Firmware.

UPDATE 5: You may also like to check out How to: Patch MobileInstallation File on iPhone 3.1.2 Firmware.

UPDATE 6: Native MMS functionality in Messages app on iPhone 2G can now be enabled using the step by step guide posted here.

UPDATE 7: Fix Push Notifications on Hacktivated iPhone 2G/3G/3GS running iPhone firmware 3.1.2 can be found here.

UPDATE 8: blackra1n RC2 is Live. Click here for more details.

UPDATE 9: blackra1n RC3 with blacksn0w is now available. Follow the complete step-by-step guide here to jailbreak, and here to unlock iPhone 3.1.2 firmware with 05.11.07 baseband.

You can follow me on twitter or join our facebook fanpage to keep yourself updated on all the latest iPhone jailbreaking and unlocking releases.

Download iTunes
Download iPhone 3.1.2 Firmware
Download blackra1n for Windows (UPDATE: blackra1n RC3 Now Available)


Video results for how to jailbreak iphone 3.1.2 youtube

Jailbreak 3.1.2 iPhone iPod Touch with ...
4 ນາທີ 47 ວິນາທີ - 14 ຕລ 2009
www.youtube.com
Jailbreak 3.1.2 iPhone & iPod Touch w ...
9 ນາທີ - 11 ຕລ 2009
www.youtube.com

Wednesday, August 27, 2008

Hack Wireless Network ด้วย โปรแกรม Air-Crack

สวัสดีคับ สืบเนื่องจากบทความหลายอันที่ผมเขียนก่อนหน้านี้เกี่ยวกับ wireless security

ซึ่งออกจะดูเป็น overview ซะเยอะแล้ว ผมไปนั่งคิดนอนคิดดูแล้ว

เห็นเมืองนอกเมืองนาก็มีเขียนวิธีสอน hack wireless กันเป็นเรื่องเป็นราว

ถ้าหากผมอยากจะมา share ให้พี่น้องอ่านกันเป็นฉบับภาษาไทยก็คงจะดีคับ

หัวข้อนี้ผมจะขอเริ่มจาก Tool ที่ง่ายที่สุดที่ผมโปรดปรานก่อนเลยละกันนะคับ

ซึ่งนั่นก็คือ “Aircrack”


Step I: Download the tools

Aircrack เป็น Tool ที่ download ได้ฟรีคับ เชิญ click ที่นี่ เพื่อ download ได้เลยคับ


Step II: Prepare the hardware

อุปกรณ์ที่ต้องการใช้ในการ hack wireless พื้นฐานไม่ได้มีอะไรมากเลยคับ


  1. เครื่อง computer: ส่วนมากคงใช้เป็น laptop กันน่ะแหล่ะคับเพราะคงไม่มีใครหอบหิ้ว

    desktop ออกไปข้างนอกเพื่อ search หาสัญญาณ wireless

    นอกเสียจากว่าพี่น้องอาจจะเพียงแค่อยากทดสอบ hack wireless ของที่บ้าน

    หรือในองค์กร อันนั้นก็ไม่ว่ากันคับ

  2. OS (Operating System): จะลงเป็น Linux หรือ Windows ก็ใช้กับ Aircrack ได้คับ

    นี่คือประเด็นหลักที่ผมชอบ Aircrack เลยล่ะ เพราะมันคือหนึ่งในไม่กี่ tool

    ในการ hack ที่บิล เกตส์ อนุญาตให้ใช้ด้วยได้คับ นอกนั้นน่ะเหรอคับส่วนมาก

    รันได้เฉพาะบน Linux platform กันทั้งนั้น


  3. Wireless card: นี่คือสิ่งจำเป็นที่ซู๊ดคับ ซึ่งผมคิดว่าปัจจุบันนี้ laptop แทบทุกเครื่อง

    ก็มักจะมี bundled มาพร้อมกับ WLAN card อยู่แล้ว เพราะงั้นก็ไม่เห็นต้อง

    เตรียมอะไรแล้วล่ะสิ? ผิดคับ เพราะไม่ใช่ว่า WLAN card ทุกๆยี่ห้อจะ

    สามารถใช้ sniff packets ได้คับ พวกนี้จะต่างกันที่ chipset คับ

    จะมีเฉพาะบาง chipset เท่านั้นที่เค้า recommend กันให้ใช้กับ OS

    Windows ได้คับ

    ด้านล่างนี้เป็นรายชื่อของ WLAN card ที่เค้าเทสกันมาแล้วคับ


    คำถามคือ อ้าวแล้ว Centrino ไม่ติดโผกับเค้าด้วยเหรอ?

    คำตอบคือ สำหรับ chipset Centrino นั้นใช้ได้เหมือนกันคับ

    แต่เฉพาะกับ Linux platform เท่านั้นคับ

    ซึ่งที่เค้าเทสกันแล้วว่าใช้ได้ก็จะมี ipw2100, ipw2200, ipw2915 และ ipw3945 คับ


Step III: Scanning the target

เมื่อมีอะไรต่อมิอะไรครบแล้ว ก็เริ่มกันได้เลยคับด้วยการหา “เหยื่อ” ก่อน

การจะ scan หา target นั้นจริงๆแล้วไม่ต้องใช้ Tool อะไรเพิ่มเติมเลยคับ ใช้ WLAN card

นี่แหล่ะ เพราะปรกติ driver ของทุก card จะสามารถ scan หา SSID ที่อยู่ภายในรัศมีอยู่แล้วคับ


หลังจากที่ scan ดูแล้วเห็นว่ามี SSID หน้าตาไม่คุ้นแถมมีกุญแจล๊อคไว้อีกตังหาก

ยังไม่ต้องตกใจคับ ลองกดปุ่ม Connect ดัง “คลิ๊ก” แล้วมีการขอให้ใส่ key


อย่างรูปข้างล่างแล้วล่ะก็….ได้การล่ะ!!! เสร็จ Aircrack แน่นอน จด SSID ไว้คับ

แล้วก็ follow ตาม step ต่อไป


Step IV: Collect WLAN Packets ด้วย Airodump

Airodump คือ Tool ที่ bundled มาพร้อมกับ Aircrack package คับ

เอาไว้สำหรับเก็บ Packets ที่วิ่งอยู่ในอากาศโดยเฉพาะ การรัน Airodump จะมี step ดังนี้คับ


  1. รัน Airodump-ng.exe ซึ่งอยู่ใน path \aircrack-ng-0.9-win\bin

    (อันนี้ต้อง unzip file ที่ download มาก่อนนะคับ)


  2. เลือก wireless card ที่ได้คัดสรรมาอย่างดีว่าจะใช้ได้กับ Airodump คับ


  3. เลือก interface type คับ ซึ่งก็คือการบอก Tool มันมา card WLAN

    ที่ใช้นั้นใช้ driver chipset อะไรนั่นเองคับ สำหรับของผมใช้ของ Atheros คับ


  4. กำหนด channel ที่ต้องการจะ scan เพื่อเก็บ packets คับ โดยปรกติผมจะเลือก

    all channel นะ แต่ถ้าหากต้องการเจาะจงไปที่การ crack access point

    ตัวใดตัวนึงเลย อาจจะ fix เบอร์ channel ได้คับเพื่อการเก็บ packet ที่รวดเร็วขึ้น


  5. ตั้งชื่อ file ที่เก็บคับ file ที่เก็บ packet จะ save ไว้เป็น file.cap คับ

    ซึ่งสามารถเปิดอ่านโดยใช้พวก packet analyzer tool

    เช่น WireShark หรือ Ethereal คับ


  6. จากนั้นมันจะถามว่าจะเก็บเฉพาะ WEP IVs ยังไม่ต้องรู้ก็ได้คับว่ามันคืออะไร

    เอาเป็นว่าจะให้เก็บเฉพาะ packet ที่เอาไปใช้เพื่อการ crack key ล้วนๆ

    หรือว่าทุก packet เลย ซึ่งแน่นอนคับ ผมเก็บหมด!!! ผมงก hehehee


  7. รอคับ รอให้ Tool มันเก็บ packet ไปเรื่อยๆ ท่องไว้ในใจเลยคับ

    ยิ่งมี traffic วิ่งเข้าออกตัว Access Point นั้นๆเยอะเท่าไหร่ ก็จะยิ่งเก็บ packet

    จำนวนมากๆได้เร็วขึ้น และยิ่งเก็บ packet ได้มากเท่าไหร่

    เวลาที่ใช้ในการ crack ก็จะน้อยลงเท่านั้นคับ


  8. พอเก็บจนหนำใจแล้ว ให้กด Ctrl+c ออกมาคับ file จะถูกเก็บเอาไว้ที่ path

    เดียวกันกับ Airodump-ng.exe โดย default คับ


Step V: Crack the WEP

หลังจากได้ file.cap มาแล้ว คราวนี้ถึงเวลาตามล่าหา key ล่ะคับ เย่ๆๆๆ

เริ่มต้นโดยการเปิด cmd ขึ้นมาคับ แล้วก็รัน command ดังนี้คับ


Aircrack-ng -n -e

โดยเปลี่ยน key length เป็น 64/128/152/256/512 คับ อันนี้ต้องเดาเอาคับว่า

target WLAN มี key ยาวขนาดไหน โดย default ถ้าหากไม่กำหนด

option นี้จะเป็น 128 คับ จริงๆแล้วมี option อื่นๆอีกมากมายคับ

สามารถ help ดูได้เองตามสะดวกโดยพิมพ์แค่ Aircrack-ng ก็พอคับ


จากนั้นก็รอให้ Tool มันรันไปเรื่อยๆคับ อย่างที่ผมบอกแหล่ะยิ่งเก็บ data ได้มาแค่ไหน

ก็ crack ได้เร็วแค่นั้นล่ะคับ จน….กระทั่ง……


YES!!! Key Found!!!!!


Step VI: ทดลอง

หลังจากได้ key มาเรียบร้อยคับ ก็มาทดลองกันว่า key ที่ crack ใช้ได้จริงรึเปล่า

ซึ่งสำหรับผม ประมาณ 99.99% ใช้ได้คับ เย่ๆๆๆๆ จะเห็นว่าจากตัวอย่างที่ผมก๊อปมาให้ดูด้านบนนี้

ผมใช้เวลาเพียง 1 วินาทีเท่านั้นในการ crack key ความยาว 128 bit ซึ่ง

โอ้วจอร์ช….!! มันว่องไวขนาดนั้นเลยเหรอ


ไม่ได้เร็วขนาดนี้ทุก case หรอกคับ ความเร็วในการ crack นอกจากจะขึ้นอยู่กับจำนวน data

ที่เก็บมาได้แล้ว ยังขึ้นกับความ complex ของ key เองด้วย แต่จากตัวอย่างนี้บังเอิญว่า

admin ระบบคงจะขี้เกียจจำ key ยากๆน่ะคับ เค้าเลยตั้งซะง่ายดายเดาง่ายขนาดนี้

ถึงได้ทำให้ตกเป็นเหยื่อของ Hacker ง่ายๆแบบนี้ไงคับ


*ข้อควรจำ
ก่อนผมจะไป ผมขอย้ำตัวเป้งๆเลยนะคับว่าอย่าใช้ความรู้นี้ไปในทางทำลายล้าง

สำหรับผมเองผมใช้ Tool ตัวนี้เพื่อที่จะหาช่องโหว่ของ WLAN ในองค์กรของผมเท่านั้นคับ

เพราะงั้นรู้แล้วก็ใช้เพื่อประกอบความรู้ตัวเองแล้วเอาไปใช้ในทางสร้างสรรค์อย่างผมเถอะนะคับ

เอ้อ.. เลิกใช้ WEP ไปเลยดีกว่าคับหันมาใช้พวก WPA2 หรือ 802.1X ปลอดภัยกว่า

วันนี้พอแค่นี้ก่อน มีคำถามอะไรเม้นมาได้คับ บ๊ายบายย

http://www.adslcool.com/network/viewrecord.php?id=95

ข้อมูลจาก http://www.siamcollective.com

LinkWithin

Related Posts Plugin for WordPress, Blogger...

Fm-radio-on-my-site

for you forever

Birthday - 13/12/1964 Death - 02/05/1997 bye bye hide

google analysis

ຊີວິດກໍ່ເໝືອນລະຄອນຕ່າງທີ່ບໍ່ສາດມາດຫຼິ້ນຄືນໃໝ່ໄດ້
ຊີວິດແມ່ນການສະແດງ ທີ່ບໍ່ມີຜູ້ກຳກັບ

online
Online Casino


website counter