welcome

welcome to my destiny :)
I'm just a guy who is smile a lot
and the god give me a power
-------------------------------------------

You say anything Just tell me all your sweet lies

-------------------------------------------------

Time may change my life
But my heart remains the same to you
Time may change your heart
My love for you never changes

Sunday, February 24, 2008

OpenOffice.org Portable

OpenOffice.org Portable

openoffice.pngthe complete office suite that's completely portable

OpenOffice.org Portable (formerly Portable OpenOffice.org) is the complete OpenOffice.org office suite -- including a word processor, spreadsheet, presentation tool, drawing package and database -- packaged as a portable app, so you can take all your documents and everything you need to work with them wherever you go.

Make a Donation - Support PortableApps.com's development and hosting

Make a Donation - Support OpenOffice.org directly

OpenOffice.org Portable is an integral part of the PortableApps.com Suite™.

Faster Shutdown

Faster Shutdown

When I try to shut down, reboot, suspend, or hibernate my laptop, it sits and thrashes, often for minutes, before giving me the "Turn Off Computer" window. (I'm running Windows XP Pro, and I'm referring to the window that pops up when you do Start Menu -> Turn Off Computer.)...It turns out that the thing that was causing the thrashing pre shutdown was that Windows was scanning my whole recycling bin before showing me the window. I'm not quite sure why - I guess there are certain events that cause it to go and check that the recycle bin isn't occupying more space than it should, and shutdown is one of those.


I've often noticed a considerable delay between picking "Shut down" off the menu and actually seeing the damn menu appear. Really annoying. So today I tried emptying my Recycle Bin, and sure enough, the response became almost instantaneous. Sweet!

posted on Monday, March 17, 2003 7:21 PM

# re: Faster Shutdown

Nathen

Posted @ 12/11/2005 3:07 AM

you could Hack the registry by going on START > RUN > REGEDIT Navigate to Hkey_Local_Machine/System/CurrentControlSet/Control/WaitToKillServiceTimeout Right click the WaitToKillServiceTimeout select Modify the Default value is 20000 ( 20 Seconds ) Modify it to less than 500 ( 500 is best )

Make Windows XP boot faster (part 2)

Make Windows XP boot faster (part 2)


Recently, we have learn how to make our XP boots faster using hardware tweaks. Now, I’m going to tell you how to make your XP boot faster using alternative method which I think is supported by any computer as long as it has Microsoft Windows XP operating system on it.

Most of the tweaks done using softwares. Make sure that you follow this instruction step by step. So that you’ll get the best result from this tweak.

The first software is:

MSCONFIG Cleanup

More information about his software you can find here:

http://www.get-in-control.com/msconfig-cleanup/

It will help you to remove disable item in startup list.

Second, this is a manual trick.

Go to [ Start] ,[ Control Panel ] , [User Accounts]

Then, click change the way users log on or off.

Untick the Fast User Switching

Third, use a Bootvis tool. Actually, Windows XP use task scheduler to defrag the boot files.So, it only defrag the bootfiles at a certain time. Using Bootvis, you can do the process anytime so that you can get fast boot time often. In addition, besides optimizing boot time, you can also reduce the time needed for Windows XP to resume after a standby and hibernating.

Dowload it here

Instruction:

opztimie boot time using bootvis

1. Open the program

2. Tick the disk utility check box

3. Go to [Trace], click “Next Boot + Drivers delay”

4. Wait for the system to restart your computer.

5. After your computer has restarted, open the programs again. Now go to [trace], click “Next Standby & Resume” Wait for the program to restart your Windows again. Do the same step for “ext Hibernate & Resume”

6. Go to [trace] then click Optimize System. After your computer have been restarted, the program will optimize your boot files automatically. So wait for the moment and enjoy a cup of coffee. After the optimization finished, proceed to the next tweak.

For the next tweak, you’ll use

: http://www.dead-eye.net/WinXP%20Services.htm

To find out how to disable unnecessary services in Windows XP. Please don’t skip this step since this will bring a lot of improvement to your boot time.

After you have completed this step,

Use this software to clean your hard disk from useless files. Clean up your registry and compact it.

You can use the trial to avoid paying them any bucks. The alternative are Regseeker from http://www.snapfiles.com/get/regseeker.html and CCleaner from http://www.ccleaner.com/

Use regseeker top optimize your registry and CCleaner to clean up your hard disk.

OK, that’s all for now. After you have done these tweaks, I’m sure your computer will boot faster than before. (although it’s better to have faster hard disk and bigger size memory module if you want a fast booting system). Nevertheless, this tweaks is still worth to try. I think I have improve my boot time at least 50% by using these tricks

Make Windows XP boot faster (part 1)

First of all, this tweak only apply to those who only have one HDD on their primary IDE channel (nothing else on device 0 or 1) and a CD-ROM and/or DVD-ROM on the secondary IDE channel.

Each time you boot Windows XP, there’s an updated file called NTOSBOOT-*.pf who appears in your prefetch directory (%SystemRoot%Prefetch) and there’s no need to erease any other files as the new prefetch option in XP really improves loading time of installed programs. We only want WindowsXP to boot faster and not decrease its performance. Thanks to Rod Cahoon (for the prefetch automation process…with a minor change of mine) and Zeb for the IDE Channel tweak as those two tricks, coupled together with a little modification, result in an EXTREMELY fast bootup:

1. Open notepad.exe, type “del c:windowsprefetch tosboot-*.* /q” (without the quotes) & save as “ntosboot.bat” in c:
2. From the Start menu, select “Run…” & type “gpedit.msc”.
3. Double click “Windows Settings” under “Computer Configuration” and double click again on “Shutdown” in the right window.
4. In the new window, click “add”, “Browse”, locate your “ntosboot.bat” file & click “Open”.
5. Click “OK”, “Apply” & “OK” once again to exit.
6. From the Start menu, select “Run…” & type “devmgmt.msc”.
7. Double click on “IDE ATA/ATAPI controllers”
8. Right click on “Primary IDE Channel” and select “Properties”.
9. Select the “Advanced Settings” tab then on the device 0 or 1 that doesn’t have ‘device type’ greyed out select ‘none’ instead of ‘autodetect’ & click “OK”.
10. Right click on “Secondary IDE channel”, select “Properties” and repeat step 9.
11. Reboot your computer.

WindowsXP should now boot REALLY faster.

There are lots of other modification that you can do to make your xp boot faster, which I will post in the next entry. (part 2)

Master Tutorial to Make Your Windows XP Super Fast

This tutorial is meant for increasing the performance of Windows XP, either it can be a fresh installation or an older windows.

1.) Following is a registry file containing a few registry modifications, which are completely safe and can increase the performance of Windows. Just download the attached ZIP file, extract it and then run the file:

xp_reg_codes.zip

2.) Right-click on Desktop and select Properties, Now in the new window goto Appearance tab and click on Effects button. Now in the new opened window uncheck the following options:

a.) Use the following transition effect for menus & tooltips.
b.) Show shadows under menus.
c.) Show window contents while dragging. (you may remain this option checked as I hv in my screenshot. It depends upon ur choice.)
d.) Use the following method to smooth edges of screen fonts. You may select “Standard” for this. I hv selected “Clear Type” coz I hv a TFT, it doesnt work properly for CRT monitors.

3.) Right-click on My Computer icon on Desktop and select Properties (or press key + key), now goto Advanced tab in new window and click on Settings button in Performance section:

Now disable all unnecessary options in Visual Effects tab, you can remain following options enabled according to your requirements:

a.) Show window contents while dragging.
b.) Smooth edges of screen fonts.
c.) Use common tasks in folders (If u use the left side pane in My computer, I don’t use it.)
d.) Use drop shadows on icon labels on the desktop. (to make the desktop icons label transparent.)
e.) Use visual styles on windows and buttons. (If u use XP themes.)

4.) Open Tools -> Folder Options and click on View tab:

Now uncheck following options:

a.) Automatically search for network folders & printers.
b.) Display file size information in folder tips.
c.) Display simple folder view in Explorer’s Folders list.
d.) Show encrypted or compressed NTFS files in color.
e.) Show pop-up description for folder and desktop icons.
f.) Use simple file sharing.

Other options don’t affect the system performance. You can enable/disable them according to your requirements.

5.) Right-click on My Computer icon on Desktop and select Manage (You can also open it by typing services.msc in RUN and press Enter). Now goto Services & Applications -> Services. Here you can set a few unnecessary services to Manual, which will not start with windows and will decrease the boot time and will increase system performance. Please follow the following tutorial to know about which services can be safely set to MANUAL:

Windows XP Services that can be Safely set to MANUAL

6.) Type msconfig in RUN and press Enter. Now goto Startup tab and deselect the unnecessary entries, which you don’t want to start automatically with Windows, e.g. you can disable VGA driver utility, Sound Card utility, etc to speed up the startup time and to increase system performance.

7.) Open Sound & Audio Devices in Control Panel (or type mmsys.cpl in RUN), goto Sounds tab and select No Sounds in Sound Scheme section. Or you can remain some of your favorite sounds but set Exit Windows, Start Windows, Windows Logoff, Windows Logon to (None).

8.) For more options/tips-n-tricks, you can use TweakUI, Tuneup Utilities 2006 and gpedit.msc (Windows XP Professional built-in tool).

Settings to Speed-up Firefox for Each System Configuration

Settings to Speed-up Firefox for Each System Configuration


Guys!

Now I’m telling some settings for different-2 configurations. So try the settings, which is best suited to ur needs. Its not my compilation. I found it from some forum but can’t remember the source. If some one knows the source, please let me know and I’ll add it here.

For fast computers and fast connections, optimal settings.

browser.display.show_image_placeholders: False
network.http.max-connections: 48
network.http.max-connections-per-server: 32
network.http.max-connections-per-proxy: 16
network.http.max-persistent-connections-per-server : 32
network.http.pipelining: True
network.http.pipelining.maxrequests: 32
network.http.proxy.pipelining: True

Quick and Dirty Settings

network.http.pipelining: True
network.http.pipelining.firstrequest: True
network.http.pipelining.maxrequests: 8
nglayout.initialpaint.delay: 0

Common to all configurations

These are the settings that seem to be common to all configuration files regardless of connection speed or computer speed with a couple of additions - plugin paths can be found with about: plugins and the bookmark menu delay is turned off.

network.http.pipelining: True
network.http.proxy.pipelining: True
network.http.pipelining.maxrequests: 8
content.notify.backoffcount: 5
plugin.expose_full_path: True
ui.submenuDelay: 0

Fast Computer Fast Connection

content.interrupt.parsing: True
content.max.tokenizing.time: 2250000
content.notify.interval: 750000
content.notify.ontimer: True
content.switch.threshold: 750000
nglayout.initialpaint.delay: 0
network.http.max-connections: 48
network.http.max-connections-per-server: 16
network.http.max-persistent-connections-per-proxy: 16
network.http.max-persistent-connections-per-server : 8
browser.cache.memory.capacity: 65536

A couple settings of note - Firefox is allocated 4096 KB of memory by default and in this configuration we give it roughly 65MB as denoted by the last line. This can be changed according to what is used.

Fast Computer, Slower Connection

This configuration is more suited to people without ultra fast connections. I’m not talking about dial up connections but slower DSL / Cable connections.

content.max.tokenizing.time: 2250000
content.notify.interval: 750000
content.notify.ontimer: True
content.switch.threshold: 750000
network.http.max-connections: 48
network.http.max-connections-per-server: 16
network.http.max-persistent-connections-per-proxy: 16
network.http.max-persistent-connections-per-server : 8
nglayout.initialpaint.delay: 0
browser.cache.memory.capacity: 65536

Fast Computer, Slow Connection

browser.xul.error_pages.enabled: True
content.interrupt.parsing: True
content.max.tokenizing.time: 3000000
content.maxtextrun: 8191
content.notify.interval: 750000
content.notify.ontimer: True
content.switch.threshold: 750000
network.http.max-connections: 32
network.http.max-connections-per-server: 8
network.http.max-persistent-connections-per-proxy: 8
network.http.max-persistent-connections-per-server : 4
nglayout.initialpaint.delay: 0
browser.cache.memory.capacity: 65536

Slow Computer, Fast Connection

content.max.tokenizing.time: 3000000
content.notify.backoffcount: 5
content.notify.interval: 1000000
content.notify.ontimer: True
content.switch.threshold: 1000000
content.maxtextrun: 4095
nglayout.initialpaint.delay: 1000
network.http.max-connections: 48
network.http.max-connections-per-server: 16
network.http.max-persistent-connections-per-proxy: 16
network.http.max-persistent-connections-per-server : 8
dom.disable_window_status_change: True

One of the changes made for this particular configuration is the final line where the status bar is disabled for changing web pages to save processor time.

Slow Computer, Slow Connection

I hv entered the doldrums of the dial-up user…

content.max.tokenizing.time: 2250000
content.notify.interval: 750000
content.notify.ontimer: True
content.switch.threshold: 750000
nglayout.initialpaint.delay: 750
network.http.max-connections: 32
network.http.max-connections-per-server: 8
network.http.max-persistent-connections-per-proxy: 8
network.http.max-persistent-connections-per-server : 4
dom.disable_window_status_change: True

Beginners Guides: 104 Tech Tips for Windows XP

- Table of Contents -

Windows Interface Tips (1-20)
  1. Increase the amount of 'frequently used programs' displayed on the start menu
  2. Remove the 'frequently used programs' list from the start menu
  3. Stop the automatic grouping of taskbar programs
  4. Close multiple desktop windows fast
  5. Add some useful commands to the right-click menu
  6. Add more destinations to the right-click menu's 'send to' command
  7. Changing the number of open programs required to 'group' on the taskbar
  8. Reduce menu delay to speed up the windows desktop
  9. Show control panel as a menu
  10. Change the default installation directory
  11. Associate and un-associate applications from certain file types.
  12. Make your mouse more responsive
  13. Increase PS/2 mouse performance
  14. Relocate your 'my documents' folder
  15. Get a better ALT+TAB application switcher
  16. Add a command prompt option to the Windows Explorer right click menu
  17. Stop 'focus stealing' by background applications and pop-ups
  18. Add the admin tools to the start menu
  19. Closing multiple taskbar items at once
  20. Using 'groups' in Windows explore

Computer Maintenance and Troubleshooting Tips (21-46)

  1. Quickly un-format web text with notepad.
  2. Uncover **** passwords
  3. Disable the annoying 'click' sound in Internet Explorer.
  4. Use VGA mode to troubleshoot monitor refresh rate problems
  5. Make your files available offline
  6. Rollback device drivers in case of error
  7. Avoid having to re-activate Windows XP after reinstallation
  8. View PowerPoint documents without PowerPoint
  9. Control Clear type Text with free tool
  10. Mouse problem? Use MouseKeys
  11. Recovering deleted files
  12. Install the backup utility in XP Home
  13. Schedule automatic data backups
  14. Place your Internet favourites on your start menu
  15. Restore your essential data
  16. Enhance the Windows calculator
  17. Disabling startup password
  18. Remove orphaned software applications from add/remove programs
  19. Troubleshooting shutdown issues
  20. Alter your windows user name
  21. Adding 'safe mode' to the boot menu
  22. Use XP file compression to save space
  23. How to check if you have a DVD decoder installed in your system
  24. Learn to love XP safe mode
  25. Use the program compatibility toolkit
  26. Use the system restore utility from 'safe mode command prompt.'

Computer Security Tips (47-54)

  1. Configure the SP 2 firewall
  2. Prevent computer users from logging on to Windows at certain times.
  3. Encrypt your important files (XP Professional only)
  4. Scan your computer for vulnerability with Microsoft's free security scanner
  5. Disable USB storage device writing (Service Pack 2 only)
  6. Prevent browser hijackers and spyware in SP2 Internet Explorer
  7. Test your PCs security with online security probes
  8. Disable annoying startup programs

WindowsXP Shortcut Tips (55 - 63)

  1. Fun with shortcuts 1: shortcuts to email
  2. Fun with shortcuts 2: shortcuts to web sites
  3. Fun with shortcuts 3: shortcuts to Windows control panels and utilities
  4. Fun with shortcuts 4: create a shortcut to shutdown or restart your PC
  5. Fun with shortcuts 5: Create a shortcut to lock your PC
  6. Fun with shortcuts 6: Create a shortcut to 'run' on your desktop
  7. Fun with shortcuts 7: Create a shortcut to command prompt on your desktop
  8. Fun with shortcuts 8: Create keyboard shortcuts for applications and folders
  9. Shortcuts to important control windows with the run command
Disk and Storage Management Tips (64 - 67)
  1. Stupid disk tricks for XP part 1: dynamic disks
  2. Stupid disk tricks for XP part 2: mounting partitions to directories
  3. Stupid disk tricks for XP part 3: creating software RAID 0
  4. Stupid Disk tricks for XP part 4: Extending and spanning volumes

Cool Tweaks, Toys and Experiments (68 - 90)

  1. Create a portable version of Windows XP
  2. Create alarms and reminders with Windows XP's scheduling service
  3. Perform a 'hands off' Windows XP installation.
  4. Experiment with 'virtual' computing
  5. Show how long your system has been running with SYSTEMINFO
  6. Use MSN messenger's 'whiteboard' feature
  7. Use MSN Messenger's Shared applications feature
  8. Collect system data with the performance monitor wizard
  9. Use a free, full featured office suite
  10. Create a Windows XP bootable CD with Service pack 2 built-in
  11. Edit local computer settings with GPEDIT (XP Professional only)
  12. Reduce the size of your recycle bin
  13. Make sure of your location on the Internet
  14. Arrange the 'all programs' list alphabetically
  15. Force 'my computer' and other folders to open in Windows explorer automatically
  16. Boost foreground applications
  17. Place the volume control on the taskbar
  18. Experiment with Linux without installing software
  19. Use Virtual desktops in Windows XP
  20. Capture screenshots in Windows XP
  21. Create an easy HTML picture slide show for your website
  22. Import pictures from a digital camera
  23. Prevent XP from shutting down normally

Networking and Internet Tips ( 91- 104)

  1. Access your PC from any system over the Internet (Professional only)
  2. Speed up network browsing in Windows XP
  3. Get the most out of your wireless network
  4. Benchmark your wireless connection
  5. Fixing the 'guest only' network access problem
  6. Hiding your computer from other systems in the same network
  7. Share Multiple Folders quickly in Windows XP
  8. Change Web page font size automatically
  9. Open web pages in a new window quickly
  10. Don't have anti-virus software? Check your PC for viruses online
  11. Save web pages for offline viewing
  12. Easier searches and popup suppression with the Google toolbar
  13. Address shortcut for Internet Explorer
  14. Remove Microsoft Java VM and install Sun Java

http://www.pcstats.com/articleview.cfm?articleID=1681

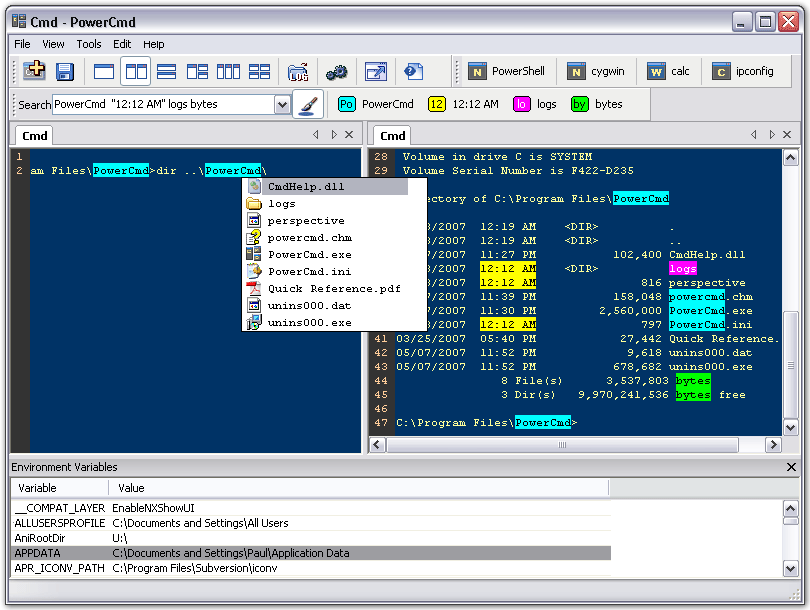
PowerCmd_v1.7.219 ທັນສະໄຫມກວ່າ ຂອງວິນໂດ

ເອົາໄປລອງ ຫຼິ້ນ ເອງ ມີຄີພ້ອມ


ດາວໂຫຼດ

http://www.laozaa.com/board/index.php?topic=4161.0

Friday, February 22, 2008

window shotcuts

Windows Shortcuts ບາງທ່ານອາດບໍ່ຮູ້ໝົດແຕ່ທນສາມາດເກັບໄວ້ໃຊ້ໄດ້ໄດ້ທີ່ນີ້

Run Commands:

Quote:
compmgmt.msc - Computer management
devmgmt.msc - Device manager
diskmgmt.msc - Disk management
dfrg.msc - Disk defrag
eventvwr.msc - Event viewer
fsmgmt.msc - Shared folders
gpedit.msc - Group policies
lusrmgr.msc - Local users and groups
perfmon.msc - Performance monitor
rsop.msc - Resultant set of policies
secpol.msc - Local security settings
services.msc - Various Services
msconfig - System Configuration Utility
regedit - Registry Editor
msinfo32 _ System Information
sysedit _ System Edit
win.ini _ windows loading information(also system.ini)
winver _ Shows current version of windows
mailto: _ Opens default email client
command _ Opens command prompt


Run Commands to access the control panel:

Quote:
Add/Remove Programs control appwiz.cpl
Date/Time Properties control timedate.cpl
Display Properties control desk.cpl
FindFast control findfast.cpl
Fonts Folder control fonts
Internet Properties control inetcpl.cpl
Keyboard Properties control main.cpl keyboard
Mouse Properties control main.cpl
Multimedia Properties control mmsys.cpl
Network Properties control netcpl.cpl
Password Properties control password.cpl
Printers Folder control printers
Sound Properties control mmsys.cpl sounds
System Properties control sysdm.cpl


Command Prompt:

Quote:
ANSI.SYS Defines functions that change display graphics, control cursor movement, and reassign keys.
APPEND Causes MS-DOS to look in other directories when editing a file or running a command.
ARP Displays, adds, and removes arp information from network devices.
ASSIGN Assign a drive letter to an alternate letter.
ASSOC View the file associations.
AT Schedule a time to execute commands or programs.
ATMADM Lists connections and addresses seen by Windows ATM call manager.
ATTRIB Display and change file attributes.
BATCH Recovery console command that executes a series of commands in a file.
BOOTCFG Recovery console command that allows a user to view, modify, and rebuild the boot.ini
BREAK Enable / disable CTRL + C feature.
CACLS View and modify file ACL's.
CALL Calls a batch file from another batch file.
CD Changes directories.
CHCP Supplement the International keyboard and character set information.
CHDIR Changes directories.
CHKDSK Check the hard disk drive running FAT for errors.
CHKNTFS Check the hard disk drive running NTFS for errors.
CHOICE Specify a listing of multiple options within a batch file.
CLS Clears the screen.
CMD Opens the command interpreter.
COLOR Easily change the foreground and background color of the MS-DOS window.
COMP Compares files.
COMPACT Compresses and uncompress files.
CONTROL Open control panel icons from the MS-DOS prompt.
CONVERT Convert FAT to NTFS.
COPY Copy one or more files to an alternate location.
CTTY Change the computers input/output devices.
DATE View or change the systems date.
DEBUG Debug utility to create assembly programs to modify hardware settings.
DEFRAG Re-arrange the hard disk drive to help with loading programs.
DEL Deletes one or more files.
DELETE Recovery console command that deletes a file.
DELTREE Deletes one or more files and/or directories.
DIR List the contents of one or more directory.
DISABLE Recovery console command that disables Windows system services or drivers.
DISKCOMP Compare a disk with another disk.
DISKCOPY Copy the contents of one disk and place them on another disk.
DOSKEY Command to view and execute commands that have been run in the past.
DOSSHELL A GUI to help with early MS-DOS users.
DRIVPARM Enables overwrite of original device drivers.
ECHO Displays messages and enables and disables echo.
EDIT View and edit files.
EDLIN View and edit files.
EMM386 Load extended Memory Manager.
ENABLE Recovery console command to enable a disable service or driver.
ENDLOCAL Stops the localization of the environment changes enabled by the setlocal command.
ERASE Erase files from computer.
EXIT Exit from the command interpreter.
EXPAND Expand a M*cros*ft Windows file back to it's original format.
EXTRACT Extract files from the M*cros*ft Windows cabinets.
FASTHELP Displays a listing of MS-DOS commands and information about them.
FC Compare files.
FDISK Utility used to create partitions on the hard disk drive.
FIND Search for text within a file.
FINDSTR Searches for a string of text within a file.
FIXBOOT Writes a new boot sector.
FIXMBR Writes a new boot record to a disk drive.
FOR Boolean used in batch files.
FORMAT Command to erase and prepare a disk drive.
FTP Command to connect and operate on a FTP server.
FTYPE Displays or modifies file types used in file extension associations.
GOTO Moves a batch file to a specific label or location.
GRAFTABL Show extended characters in graphics mode.
HELP Display a listing of commands and brief explanation.
IF Allows for batch files to perform conditional processing.
IFSHLP.SYS 32-bit file manager.
IPCONFIG Network command to view network adapter settings and assigned values.
KEYB Change layout of keyboard.
LABEL Change the label of a disk drive.
LH Load a device driver in to high memory.
LISTSVC Recovery console command that displays the services and drivers.
LOADFIX Load a program above the first 64k.
LOADHIGH Load a device driver in to high memory.
LOCK Lock the hard disk drive.
LOGON Recovery console command to list installations and enable administrator login.
MAP Displays the device name of a drive.
MD Command to create a new directory.
MEM Display memory on system.
MKDIR Command to create a new directory.
MODE Modify the port or display settings.
MORE Display one page at a time.
MOVE Move one or more files from one directory to another directory.
MSAV Early M*cros*ft Virus scanner.
MSD Diagnostics utility.
MSCDEX Utility used to load and provide access to the CD-ROM.
NBTSTAT Displays protocol statistics and current TCP/IP connections using NBT
NET Update, fix, or view the network or network settings
NETSH Configure dynamic and static network information from MS-DOS.
NETSTAT Display the TCP/IP network protocol statistics and information.
NLSFUNC Load country specific information.
NSLOOKUP Look up an IP address of a domain or host on a network.
PATH View and modify the computers path location.
PATHPING View and locate locations of network latency.
PAUSE Command used in batch files to stop the processing of a command.
PING Test / send information to another network computer or network device.
POPD Changes to the directory or network path stored by the pushd command.
POWER Conserve power with computer portables.
PRINT Prints data to a printer port.
PROMPT View and change the MS-DOS prompt.
PUSHD Stores a directory or network path in memory so it can be returned to at any time.
QBASIC Open the QBasic.
RD Removes an empty directory.
REN Renames a file or directory.
RENAME Renames a file or directory.
RMDIR Removes an empty directory.
ROUTE View and configure windows network route tables.
RUNAS Enables a user to execute a program on another computer.
SCANDISK Run the scandisk utility.
SCANREG Scan registry and recover registry from errors.
SET Change one variable or string to another.
SETLOCAL Enables local environments to be changed without affecting anything else.
SETVER Change MS-DOS version to trick older MS-DOS programs.
SHARE Installs support for file sharing and locking capabilities.
SHIFT Changes the position of replaceable parameters in a batch program.
SHUTDOWN Shutdown the computer from the MS-DOS prompt.
SMARTDRV Create a disk cache in conventional memory or extended memory.
SORT Sorts the input and displays the output to the screen.
START Start a separate window in Windows from the MS-DOS prompt.
SUBST Substitute a folder on your computer for another drive letter.
SWITCHES Remove add functions from MS-DOS.
SYS Transfer system files to disk drive.
TELNET Telnet to another computer / device from the prompt.
TIME View or modify the system time.
TITLE Change the title of their MS-DOS window.
TRACERT Visually view a network packets route across a network.
TREE View a visual tree of the hard disk drive.
TYPE Display the contents of a file.
UNDELETE Undelete a file that has been deleted.
UNFORMAT Unformat a hard disk drive.
UNLOCK Unlock a disk drive.
VER Display the version information.
VERIFY Enables or disables the feature to determine if files have been written properly.
VOL Displays the volume information about the designated drive.
XCOPY Copy multiple files, directories, and/or drives from one location to another.
TRUENAME When placed before a file, will display the whole directory in which it exists
TASKKILL It allows you to kill those unneeded or locked up applications


Windows XP Shortcuts:

Quote:
ALT+- (ALT+hyphen) Displays the Multiple Document Interface (MDI) child window's System menu
ALT+ENTER View properties for the selected item
ALT+ESC Cycle through items in the order they were opened
ALT+F4 Close the active item, or quit the active program
ALT+SPACEBAR Display the System menu for the active window
ALT+TAB Switch between open items
ALT+Underlined letter Display the corresponding menu
BACKSPACE View the folder one level up in My Computer or Windows Explorer
CTRL+A Select all
CTRL+B Bold
CTRL+C Copy
CTRL+I Italics
CTRL+O Open an item
CTRL+U Underline
CTRL+V Paste
CTRL+X Cut
CTRL+Z Undo
CTRL+F4 Close the active document
CTRL while dragging Copy selected item
CTRL+SHIFT while dragging Create shortcut to selected iteM
CTRL+RIGHT ARROW Move the insertion point to the beginning of the next word
CTRL+LEFT ARROW Move the insertion point to the beginning of the previous word
CTRL+DOWN ARROW Move the insertion point to the beginning of the next paragraph
CTRL+UP ARROW Move the insertion point to the beginning of the previous paragraph
SHIFT+DELETE Delete selected item permanently without placing the item in the Recycle Bin
ESC Cancel the current task
F1 Displays Help
F2 Rename selected item
F3 Search for a file or folder
F4 Display the Address bar list in My Computer or Windows Explorer
F5 Refresh the active window
F6 Cycle through screen elements in a window or on the desktop
F10 Activate the menu bar in the active program
SHIFT+F10 Display the shortcut menu for the selected item
CTRL+ESC Display the Start menu
SHIFT+CTRL+ESC Launches Task Manager
SHIFT when you insert a CD Prevent the CD from automatically playing
WIN Display or hide the Start menu
WIN+BREAK Display the System Properties dialog box
WIN+D Minimizes all Windows and shows the Desktop
WIN+E Open Windows Explorer
WIN+F Search for a file or folder
WIN+F+CTRL Search for computers
WIN+L Locks the desktop
WIN+M Minimize or restore all windows
WIN+R Open the Run dialog box
WIN+TAB Switch between open items


Windows Explorer Shortcuts:

Quote:
ALT+SPACEBAR - Display the current window’s system menu
SHIFT+F10 - Display the item's context menu
CTRL+ESC - Display the Start menu
ALT+TAB - Switch to the window you last used
ALT+F4 - Close the current window or quit
CTRL+A - Select all items
CTRL+X - Cut selected item(s)
CTRL+C - Copy selected item(s)
CTRL+V - Paste item(s)
CTRL+Z - Undo last action
CTRL+(+) - Automatically resize the columns in the right hand pane
TAB - Move forward through options
ALT+RIGHT ARROW - Move forward to a previous view
ALT+LEFT ARROW - Move backward to a previous view
SHIFT+DELETE - Delete an item immediately
BACKSPACE - View the folder one level up
ALT+ENTER - View an item’s properties
F10 - Activate the menu bar in programs
F6 - Switch between left and right panes
F5 - Refresh window contents
F3 - Display Find application
F2 - Rename selected item


Internet Explorer Shortcuts:

Quote:
CTRL+A - Select all items on the current page
CTRL+D - Add the current page to your Favorites
CTRL+E - Open the Search bar
CTRL+F - Find on this page
CTRL+H - Open the History bar
CTRL+I - Open the Favorites bar
CTRL+N - Open a new window
CTRL+O - Go to a new location
CTRL+P - Print the current page or active frame
CTRL+S - Save the current page
CTRL+W - Close current browser window
CTRL+ENTER - Adds the http://www. (url) .com
SHIFT+CLICK - Open link in new window
BACKSPACE - Go to the previous page
ALT+HOME - Go to your Home page
HOME - Move to the beginning of a document
TAB - Move forward through items on a page
END - Move to the end of a document
ESC - Stop downloading a page
F11 - Toggle full-screen view
F5 - Refresh the current page
F4 - Display list of typed addresses
F6 - Change Address bar and page focus
ALT+RIGHT ARROW - Go to the next page
SHIFT+CTRL+TAB - Move back between frames
SHIFT+F10 - Display a shortcut menu for a link
SHIFT+TAB - Move back through the items on a page
CTRL+TAB - Move forward between frames
CTRL+C - Copy selected items to the clipboard
CTRL+V - Insert contents of the clipboard
ENTER - Activate a selected link
HOME - Move to the beginning of a document
END - Move to the end of a document
F1 - Display Internet Explorer Help

thanks

http://protools.byethost13.com/index.php?topic=28.msg30;topicseen#msg30

Wednesday, February 20, 2008

Toshi - MISSION [1994.06.01]

Toshi - MISSION [1994.06.01]

Toshi - MISSION

01 Rusty Eyes
02 LADY
03 Bless You
04 CHASE OF TIMES
05 Get-up-and-go
06 Heart of the back
07 Always
08 intermission
09 Love Dynamics
10 Looming
11 Moonstone
Download

Monday, February 18, 2008

BLOOD - Spleen ~Despair~ [2006.10.07]

BLOOD - Spleen ~Despair~ [2006.10.07]

BLOOD - Spleen ~Despair~

01 SPLEEN
02 LE REVENANT
03 DANSE MACABRE
04 LES LITANIES DE SATAN
05 L’IRREPARABLE
Download

THE SKULL FUCK REVOLVERS -「LEONID/BIRTH」[2007.10.31]

THE SKULL FUCK REVOLVERS -「LEONID/BIRTH」[2007.10.31]


i just found them from this blog http://takosashimi.wordpress.com/

but i never heard them song it's must be cool just download and try :D

01 LEONID
02 BIRTH
03 THE GREAT FILTHY LUCRE VOYAGE
Download

THE SKULL FUCK REVOLVERS are:
THE SKULL FUCK REVOLVERS
Vocal: JACK O JOESTAR Jr. (JOJO)
Guitar: NORTH Mt. THE DEVIL (DEVIL)
Bass : ANDIANA JOESTAR (ANDY)
Mandolin: LULU McCUEEN (LULU)
Violin: THOMAS CURLYHAIR (TOM)
Drums: JANE ELIZABETH 13 (JANE)

ปรับแต่งวินโดวส์สำหรับคอเกมส์

บทความต่อไปนี้จะเป็นวิธีทางที่ทำให้คอมฯของคุณเล่นเกมส์แบบลื่นใหล มันเป็นการแต่งครื่องสำหรับคนที่รักในการเล่นเกมส์โดยเฉพาะ ผมได้เรียบเรียงมาจาก Forum นอกเขา เอามาบอกเพื่อนๆคอเกมส์ทั้งหลาย ซึ่งก็มีหลายขั้นตอนลองทำตามได้เลยนะครับ

1.ยกเลิกการทำงานและคุณสมบัติของวินโดวส์ที่ไม่ได้ใช้ประโยชน์ (สำหรับการเล่นเกมส์)

-ยกเลิกการทำงานของโปรแกรมที่ทำงานแบบ Background

ปกติการทำงานของวินโดวส์มันจะโหลดโปรแกรมบางตัวรัน background อยู่ทำให้ระบบช้าลงสำหรับการเล่นเกมส์ ซึ่งจะมีตัวหลักๆเลยอยู่ 3 ตัว ได้แก่ Automatic updates, System restore และ Remote assistance ยกเลิกมันซะ วิธีการได้แก่

1.เปิด Control Panel ขึ้นมา

2.ให้คุณดับเบิ้ลที่ไอคอน System เพื่อเรียก System ขึ้นมา

3.ไปที่แท็บ Automatic Update ให้คลิกเลือกที่ Turn off Automatic Updates


4.ไปที่แท็บ System Restore ให้คลิกเลือก Turn off System Restore on all drives


5.ไปที่แท็บ Remote ให้คลิกความเครื่องหมายถูกออกจาก Remote Assistance และ Remote Dasktop คลิก Apply และ OK


-ยกเลิก Services ของวินโดวส์

เมื่อทำตามข้างบนแล้ว....ยังครับยังไม่หมดสำหรับคุณสมบัติของวินโดวส์ที่มันจะจัดการให้คุณทุกเรื่องไป ต้องมีเอาออกอีกนั้นก็คือพวก Services ต่างๆ

1.ให้คุณเรียก Control Panel ขึ้นมา

2.ให้คุณดับเบิ้ลที่ไอคอน Adminastrative Tools แล้วเลือกที่ Services

คลิกเพื่อดูภาพขนาดจริง


เมื่อหน้าต่าง Services เปิดออกมาให้สังเกตหน้าต่างด้านขวาจะมีรายชื่อ Services ต่างๆอยู่เยอะมาก ตามปกติคอมฯทั่วไปมันจะมี Services อยู่ประมาณ 27 ตัวที่จะรันอยู่ตลอดเวลา ซึ่งในจำนวนนี้มีอยู่เกินครึ่งที่คุณๆ ไม่จำเป็นต้องใช้เลย แต่วินโดวส์มันรู้ดีจัดการให้ ในที่นี่ เราจะมา Disable Services ที่ไม่จำเป็นสำหรับการเล่นเกมส์ เช่น พวก Printer,Broadband Connection, Networking,routing หรือ พวก Wireless ต่างๆ

3.ให้คุณดับเบิ้ลคลิก Services ที่คุณจะ Disable แล้วเลือกที่ Startup type คลิก drop-down menu เลือก Disable คลิก Apply และ OK ทำแบบนี้ทุกตัวที่จะ Disable การทำงานของ Service


ส่วน Services ตัวไหนบ้างที่จะ Disable ได้สำหรับงานนี้ ก็ตามรายชื่อนี้เลยครับ

Automatic Updates
ClipBook
COM+ Event System
Creative Service for CDROM Access (ถ้าเครื่องคุณมี Creative soundcard)
Cryptographic Services
Distributed Link Tracking Client
Distributed Transaction Coordinator
DNS Client (ไมต้อง Disable ถ้าคุณใช้ Dial-up internet connection)
Error Reporting Service
HID Input Service
Indexing Service
IPSEC Services
Messenger
MS Software Shadow Copy Provider
NetMeeting Remote Desktop Sharing
Network DDE
Network DDE DSDM
NVIDIA Display Driver Service (สำหรับผู้ที่ใช้ NVIDIA card)
Performance Logs and Alerts
Portable Media Serial Number
Print Spooler (ถ้าเครื่องไม่มี printer)
QoS RSVP
Remote Desktop Help Session Manager
Remote Registry
Routing and Remote Access
Security Accounts Manager
Server
Shell Hardware Detection
Smart Card
Smart Card Helper
System Event Notification
TCP/IP NetBIOS Helper
Telnet
Terminal Services
Themes (ถ้าคุณไม่สนใจความสวยงามของ desktop)
Upload Manager
WebClient
Wireless Zero Configuration
WMDM PMSP Service
WMI Performance Adapter
Workstation


-ทำความสะอาด Startup Programs

ยังมีอีกจุดหนึ่งครับที่จะต้องปรับแต่งสำหรับหัวข้อนี้ได้แก่ Startup Programs ปกติตอนวินโดวส์ start ขึ้นมามันก็จะรันโปรแกรมต่างๆ ในจุดนี้ ฉะนั้นคุณต้องเอามันออกเพื่อที่วินโดวส์จะ start แบบ Clean up วิธีการก็ตามนี้

1.คลิกที่ Start > Run พิมพ์คำสั่ง msconfig แล้ว enter

2.ที่หน้าต่าง System Configuration Utilty ให้คุณไปที่แท็บ Startup คลิกที่ Disable All

3.คลิก Apply และ OK แล้วคลิก Yes เพือ Restart เครื่อง

คลิกเพื่อดูภาพขนาดจริง


2.ปรับแต่ง Windows Page Files

ปกติการทำงานของวินโดวส์เมื่อคุณรันโปรแกรมใดโปรแกรมหนึ่งมันจะใช้พื้นที่ของ RAM เป็นหลักก่อน ถ้าไม่พอวินโดวส์้จะใช้พื้นที่ที่ฮาร์ดดิสก์ทำ swap file หรือ Page files แทน เกมส์ก็เป็นเหมือนโปรแกรมเช่นกัน ถ้าคอมฯ ของคุณมี RAM มากโปรแกรมก็จะทำงานได้เร็วและดีขึ้น เพราะใช้พื้นที่ที่ RAM ซึ่งมันทำงานได้เร็วกว่าฮาร์ดดิสก์มาก แต่เครื่องคอมฯ แต่ละเครื่องมันใช้ RAM ไม่เท่ากัน การตั้ง Page Files ให้ระบบสมดูลย์ย่อมไม่เหมือนกัน เรามาตั้ง Page Files ให้เหมาะสมกับเครื่องที่เล่นเกมส์เป็นหลักได้ดังนี้

1.ให้เปิด Control Panel ขึ้นมา

2.ดับเบิ้ลคลิกที่ไอคอน System เมื่อหน้าต่าง System Properties เปิดออกมาให้ไปที่แท็บ Advanced


3.คลิกที่ Setting ของหัวข้อ Performance แล้วคลิกที่แท็บ Advanced ของหน้าต่าง Performance Options คลิกที่ Change


4.ที่หน้าต่าง Virtual Memory ให้คลิกที่ Custom size: แล้วเปลื่ยน Page Files ในช่อง Initial size และ Maximum size ตามนี้
ถ้าคุณมี RAM

128MB ให้ตั้งค่าเท่ากับ 1500MB
256MB ให้ตั้งค่าเท่ากับ 1000MB
512MB ให้ตั้งค่าเท่ากับ 700MB
1GB ให้ตั้งค่าเท่ากับ 500MB

เสร็จแล้วคลิก Set และ OK


3.ทำความสะอาดระบบวินโดวส์ของคุณ

มาถึงขั้นตอนนี้ ก็คือการทำความสะอาดระบบที่มักจะมีขยะและสิ่งแปลกปลอม เช่น Adaware ,Spyware ,Trojans, Dialers, Malware ซึ่งโปรแกรมที่จะแนะนำสำหรับการกำจัดพวกนี้คุณๆ ส่วนใหญ่จะรู้จักหรือเคยใช้อยู่แล้ว

Ad-Aware
http://majorgeeks.com/download506.html

Spybot S&D
http://majorgeeks.com/download2471.html

Reg Seeker
http://majorgeeks.com/download2579.html

CCleaner
http://majorgeeks.com/download4191.html

แนะนำตัวจัด Memory ให้อีกตัว

Cacheman (แนะนำควรจะมีไว้สำหรับคอมฯ ที่มี RAM 512MB หรือน้อยกว่า)
http://majorgeeks.com/download308.html

สำหรับโปรแกรมที่แนะนำให้ใช้ 3 ตัวแรกคิดว่าคุณๆ น่าจะใช้ได้ไม่มีปัญหาและตัวโปรแกรมก็ใช้ง่ายอยู่แล้ว ติดตั้งเสร็จก็ใช้ได้เลยไม่ต้องตั้ง Config ให้ยุ่งยาก ค่าที่ให้มาของโปรแกรมก็เหมาะสมแล้ว ที่จะกล่าวในที่นี้ก็ 2 ตัวหลังได้แก่ CCleaner กับ Cacheman

CCleaner

สำหรับตัวการใช้ต้องมีการปรับแต่งกันบ้าง

1.เริ่มแรกเมื่อคุณเปิดโปรแกรมขึ้นมา คลิกที่แท็บ Windows

คลิกเพื่อดูภาพขนาดจริง


2.ให้คุณติ๊กเครื่องหมายถูกทุกตัวในหัวข้อนี้ ยกเว้น Windows Size/Location Cache

3.คลิก Analyze รอสักครู่ให้โปรแกรมตรวจสอบวินโดวส์สักครู่ เมื่อโปรแกรมแจ้งมา (มีรายละเอียดออกมาทางหน้าต่างขวามือ) ให้คุณคลิก Run Cleaner

4.คลิกที่แท็บ Applications ทำเหมือนข้อ 3

5. คลิกไอคอน Issues ติ้กเครื่องหมายถูกทุกข้อในหัวข้อนี้

คลิกเพื่อดูภาพขนาดจริง


6.คลิก Scan for Issues รอให้โปรแกรมทำงานสักครู่ เมื่อได้ผลออกมา (รายการที่หน้าต่างขวา) ก็คลิก Fix selected issues..

7.คลิกที่ไอคอน Options แล้วคลิกที่ Advanced

8.ติ๊กเอาเครื่องหมายถูกที่ Only delete files in Windows Temp folder older than.. ออก แล้วออกจากโปรแกรม

คลิกเพื่อดูภาพขนาดจริง


Cacheman

มาถึงตัวบริหาร RAM หรือความจำที่เครื่องมีให้เหมาะสม

1.เมื่อเปิดโปรแกรมขึ้นมาให้คลิกที่ Setting แล้วคลิกที่ RAM

คลิกเพื่อดูภาพขนาดจริง


2.ที่แท็บ Recovery ที่หัวข้อ Memory amount ให้คลิกที่ User defined แล้วใช้เม้าส์คลิกลาก Slide มาสุดทางขวามือ

3.ให้คุณเอาเครื่องหมายถูกออกจาก Do not recover on high CPU usage, Do not recover on high disk activity, Recover on startup และ Change tray Icon when recovering ส่วน Extreme recovery mode ให้เอาเครื่องหมายถูกเก็บไว้

4.คลิกที่แท็บ Optimization ติ๊กเครื่องหมายถูกที่ Disable executive paging และ Unload DLL's from memory

คลิกเพื่อดูภาพขนาดจริง


5.คลิกที่เมนู File เลือก Save setting คลิก Yes แล้ว Restart เครื่อง


6.เวลาที่คุณจะใช้งานก็เรียกโปรแกรมขึ้นจะมีไอคอนอยู่ที่มุมขวาของ Task Bar คุณเพียงคลิกขวาที่ไอคอนนี้แล้วเลือกคำสั่ง Recover Memory Now โปรแกรมก็จะจัดหน่วยความจำให้คุณตามที่คุณตั้งไว้ก่อนหน้านี้


4.ปรับแต่ง BIOS ให้เหมาะกับเกมส์

ขั้นตอนนี้ก็มาที่ BIOS ของเครื่องที่จะต้องมีการปรับแต่งในการนี้ด้วยเล็กน้อย วิธีการที่จะเข้า BIOS ก็ให้คุณเปิดเครื่องระหว่างที่เครื่องเริ่มทำงานให้กดปุ่ม DEL หรือ F1 แล้วแต่เมนบอร์ดแต่ละยี่ี้ห้อไม่เหมือนกัน แต่ส่วนมากจะใช้ปุ่ม DEL เมื่อเครื่องเขา BIOS แล้วให้ไปดูที่หัวข้อ AGP เป็นหลักให้คุณปรับ

-AGP Aperture size ไว้ตำแหน่งสูงสุด
-AGP mode ให้ปรับเป็น 8X หรือสูงกว่านั้น ถ้ามี
-AGP Fastwrite ให้ตั้งเป็น Enabled

ในกรณีที่ BIOS ของคุณมีหัวข้อ USB 2.0 controller ให้คุณปรับเป็น "Fullspeed"ด้วย

5.Driver Update

ให้อัปเดทเครื่องให้มีไดร์เวอร์ของ Graphics card และ Sound card ให้ใหม่ล่าสุด โดยแนะนำให้โหลดจากเว็บเจ้าของผลิตภัณท์

Graphics card

-nVIDIA

http://nvidia.com/content/drivers/drivers.asp

-ATI

http://ati.com/support/driver.html


Sound cards

-Creative Soundblaster

http://creative.com/support/

Windows Updates

แนะนำให้คุณๆอัปเดท Critical และ Patches ต่างๆที่วินโดวส์ออกมาแก้ไขวินโดวส์เพื่อความสมบูรณ์ของระบบ แต่ก็รู้ๆ กันอยู่ว่าคุณไม่สามารอัปเดทออนไลน์ได้ (คงไม่ต้องบอกว่าสาเหตุเพราะอะไร) ก็มีทางเลือกให้คือไปโหลดอัปเดทที่ชาวเน็ตชอบใช้บริการได้แก่ AutoPatcher XP ตามนี้

http://www.autopatcher.com

http://www.neowin.net/forum/index.php?showforum=89

คลิกเพื่อดูภาพขนาดจริง


6.ทิปเล็กๆ

1.ก่อนที่จะเล่นเกมส์ควรจะเปิด Cacheman และ Recover Memory ก่อนทุกครั้งเพื่อที่เกมส์จะใช้ Memory ได้เต็มที่

2.ปรับการทำงานของ CPU ให้ถ่ายเทประสิทธิภาพไปที่เกมส์ที่คุณเล่นโดยปรับที่ Windows Task Manager ให้เป็น High CPU Priority วิธีทำก็

-เปิดWindows Task Manager โดยกดปุ่ม ctrl+alt+del พร้อมกันหรือ ใช้เม้าส์คลิกขวาที่ Task bar แล้วเลือก Task Manager

-ไปที่แท็บ Processes หาชื่อเกมส์ของคุณ แล้วคลิกขวาเลือก Set Priority คลิกที่ High คลิก Yes คราวนี้เครื่องคุณ CPU ก็จะเน้นการทำงานไปที่เกมส์ของคุณ


3.ให้ทำการ Defragment ฮาร์ดดิสก์ของคุณเพื่อให้ข้อมูลในเครื่องมีการต่อเนื่องเกิด Clutter File น้อยที่สุดหรือไม่มีเลย การทำ Defragment ก็ประมาณอย่างน้อย 1-2 ครั้งต่อเดือน

4.ทุกครั้งที่จะเล่นเกมส์ให้ปิดโปรแกรมที่เปิดค้างไว้ให้มากที่สุด เช่น MSN messanger หรือ IRC เพื่อประสิทธิภาพในการเล่นเกมส์ได้ลื่นใหล

จบแล้วครับลองดูนะครับคุณๆที่เป็นคอเกมส์ทั้งหลายรับรองถ้าทำตามวิธีที่กล่าวมาทั้งหมด คุณจะเล่นเกมส์ได้แบบลื่นใหลขึ้นมาก


http://www.pantip.com/tech/article/article.php?id=97

Sunday, February 17, 2008

X-Japan ประกาศเพิ่มรอบคอนเสิร์ต


Yoshiki ประกาศเพิ่มรอบคอนเสิร์ตของ X-Japan ที่โตเกียวโดมในวันที่ 29 มีนาคม
แต่เดิมนั้น มีการประกาศจัดคอนเสิร์ตในวันที่ 28 และ 30 มีนาคม แต่เนื่องจากหลังจากประกาศขายตั๋วคอนเสิร์ต มีจำนวนผู้ต้องการซื้อตั๋วเกินกว่า 100,000คน จนมีผลกระทบให้เวปไซด์ Yoshiki Mobile ต้องปิดการจองตั๋วอย่างรวดเร็วถึงแม้จะมีการรื้อเวทีบางส่วนออกเพื่อเพิ่มที่นั่ง ก็ยังไม่เพียงพอต่อความต้องการตั๋ว ทำให้ Yoshiki ตัดสินใจเพิ่มรอบการแสดงขึ้นอีก 1 วัน

การแสดงคอนเสิร์ตติดต่อกัน 3 วันครั้งแรกของ X-Japanในปี 1992 ที่โตเกียวโดม Yoshiki ถูกหามเข้าโรงพยาบาลในวันสุดท้าย เนื่องจากการตีกลองอย่างหักโหมมากเกินไป

ในการแสดงครั้งนี้ Yoshiki กล่าวว่า เขาต้องการแสดงความขอบคุณต่อแฟน ๆ ที่ให้กำลังใจกันเสมอมา และเขายังได้เตรียมพร้อมฟิตร่างกายราวกับจะไปแข่งกีฬาโอลิมปิคเพื่อการแสดงในครั้งนี้อีกด้วย

<X JAPAN Tokyo Dome>
28 March ~Destruction Night~
29 March ~Reckless Night~
30 March~Creation night~

YOSHIKI Interview

Office Website

Tuesday, February 12, 2008

Download DirectX 10 for Windows XP

Download DirectX 10 for Windows XP


deferent DirectX 9 and DirectX 10

DX 9 scenery from Flight Simulator X

DirectX 9 Flight Simulator Screenshot

And a rendering of the same scenery with DirectX 10

DirectX 10 Flight Simulator Screenshot


So, Here is DirectX 10 Alky preview ( Click to download ) which can be used with DX10 SDK.


The DirectX 10 for Windows XP Preview contains a read me file which goes like this :-

To install:
Copy d3d10.dll, d3dx10.dll, d3dx10.dll, dxgi.dll, and Nucleus.dll to C:\windows\system32\

To get the examples:

To build and run an example:

  • Go to the Microsoft DirectX SDK folder, Samples, C++, Direct3D10, Tutorials, Tutorial12
  • Double-click “Tutorial12_2005.sln”
  • Select “Start Without Debugging” from the Debug menu.

There are a number of known issues with most of the tutorials, but they will all work to some extent. Tutorial 12 is currently the recommended example.

Please direct any feedback to the Falling Leaf Discussion forum

if you’re serious computer gamer, i highly recommended you give a try download on Direct10X for windows XP and install it. Then you feel the differences especially on the images rendering and images processing. However, Do it carefully !!!!

Download the latest DirectX for Windows XP

More information : DirectX 10 Vista vs DirectX 9 XP


Download the latest DirectX for Windows XP


http://www.techmixer.com/download-directx-10-for-windows-xp/


Computer Shopper January 2008

Computer Shopper January 2008


INFO:
sx2 media labs|JANUARY 2008|102 Pages|PDF|19.13MB


DOWNLOAD:
http://rapidshare.com/files/75268161/computer_shoper_magJAN08.rar

http://goleech.org/ebooks/computer-shopper-january-2008/

Dick: A Guide to the Penis for Men and Women

INFO:
Everything you could possibly want to know about the “crown jewels”, but were afraid to ask, including why men so fond of their most prized possession, how it works and what to do when it doesn’t. Although they might be quick with jokes, men are often reluctant to discuss their penis and might not have accurate information about it. This is an accurate but accessible and entertaining manual written for both men and women. The authors explain everything from what it’s called, to the anatomy and physiology of the penis: size, shape, function, circumcision, hygiene, hormones and contraception. They explain what can go wrong - sexually transmitted diseases, infertility, premature ejaculation, impotence and cancer - and provide useful information on how to avoid and deal with these nasties. They uncover the myths of male sexuality, and poke fun at the names we call it and the things it does. The book presents the facts in a manner easily accessible and relevant to all ages, and answers questions men and women are often too embarrassed to ask.

DOWNLOAD:
http://rapidshare.com/files/90628014/Guide_to_the_Penis.cape.rar.rar

Universal Drivers - 25,000 drivers for Windows

Universal Drivers - 25,000 drivers for Windows


INFO:
No more need to spend hours on-line browsing for drivers.
Just pop the Universal Driver CD in and Windows will automatically search the comprehensive drivers.

This CD, (Iso format) contains software drivers for over 25,000 hardware components from brands such as Dell, HP, Compaq, IBM, Sony, Toshiba, Panasonic, as well as hardware component manufacturers Intel, 3Com, VIA, nVidia, ATI, SoundMax, and many more…

DOWNLOAD:
http://rapidshare.com/files/91258281/25KDW.part1.rar
http://rapidshare.com/files/91253350/25KDW.part2.rar
http://rapidshare.com/files/91248440/25KDW.part3.rar
http://rapidshare.com/files/91241067/25KDW.part4.rar


thanks

http://goleech.org/application/universal-drivers-25000-drivers-for-windows/#more-7442

Adobe Reader 8.1.2 / 7.0.9 Final


External Mirror 1

External Mirror 2 - 7.0.9
Secure Downloads are files hosted and checked by Softpedia Softpedia Secure Download (US)
Secure Downloads are files hosted and checked by Softpedia Softpedia Secure Download (RO)

LANGUAGE PACKS / INTERNATIONALIZED VERSIONS

German (Full installer)

French (Full installer)

Spanish (Full installer)

Italian (Full installer)

Japan (Full installer)

Adobe Acrobat Reader is free, and freely distributable software that lets you view and print Portable Document Format (PDF) files. Acrobat Reader also lets you fill in and submit PDF forms online. Adobe Portable Document Format Invented by Adobe Systems and perfected over 15 years, Adobe Portable Document Format (PDF) lets you capture and view robust information — from any application, on any computer system — and share it with anyone around the world. Reasons to upgrade to Adobe Reader 8: Enjoy a new interface, new tools, and more options View information more precisely and e... [ read more about Adobe Reader >> ]

thanks source

http://www.softpedia.com/progDownload/Adobe-Reader-Download-2572.html

LinkWithin

Related Posts Plugin for WordPress, Blogger...

Fm-radio-on-my-site

for you forever

Birthday - 13/12/1964 Death - 02/05/1997 bye bye hide

google analysis

ຊີວິດກໍ່ເໝືອນລະຄອນຕ່າງທີ່ບໍ່ສາດມາດຫຼິ້ນຄືນໃໝ່ໄດ້
ຊີວິດແມ່ນການສະແດງ ທີ່ບໍ່ມີຜູ້ກຳກັບ

online
Online Casino


website counter